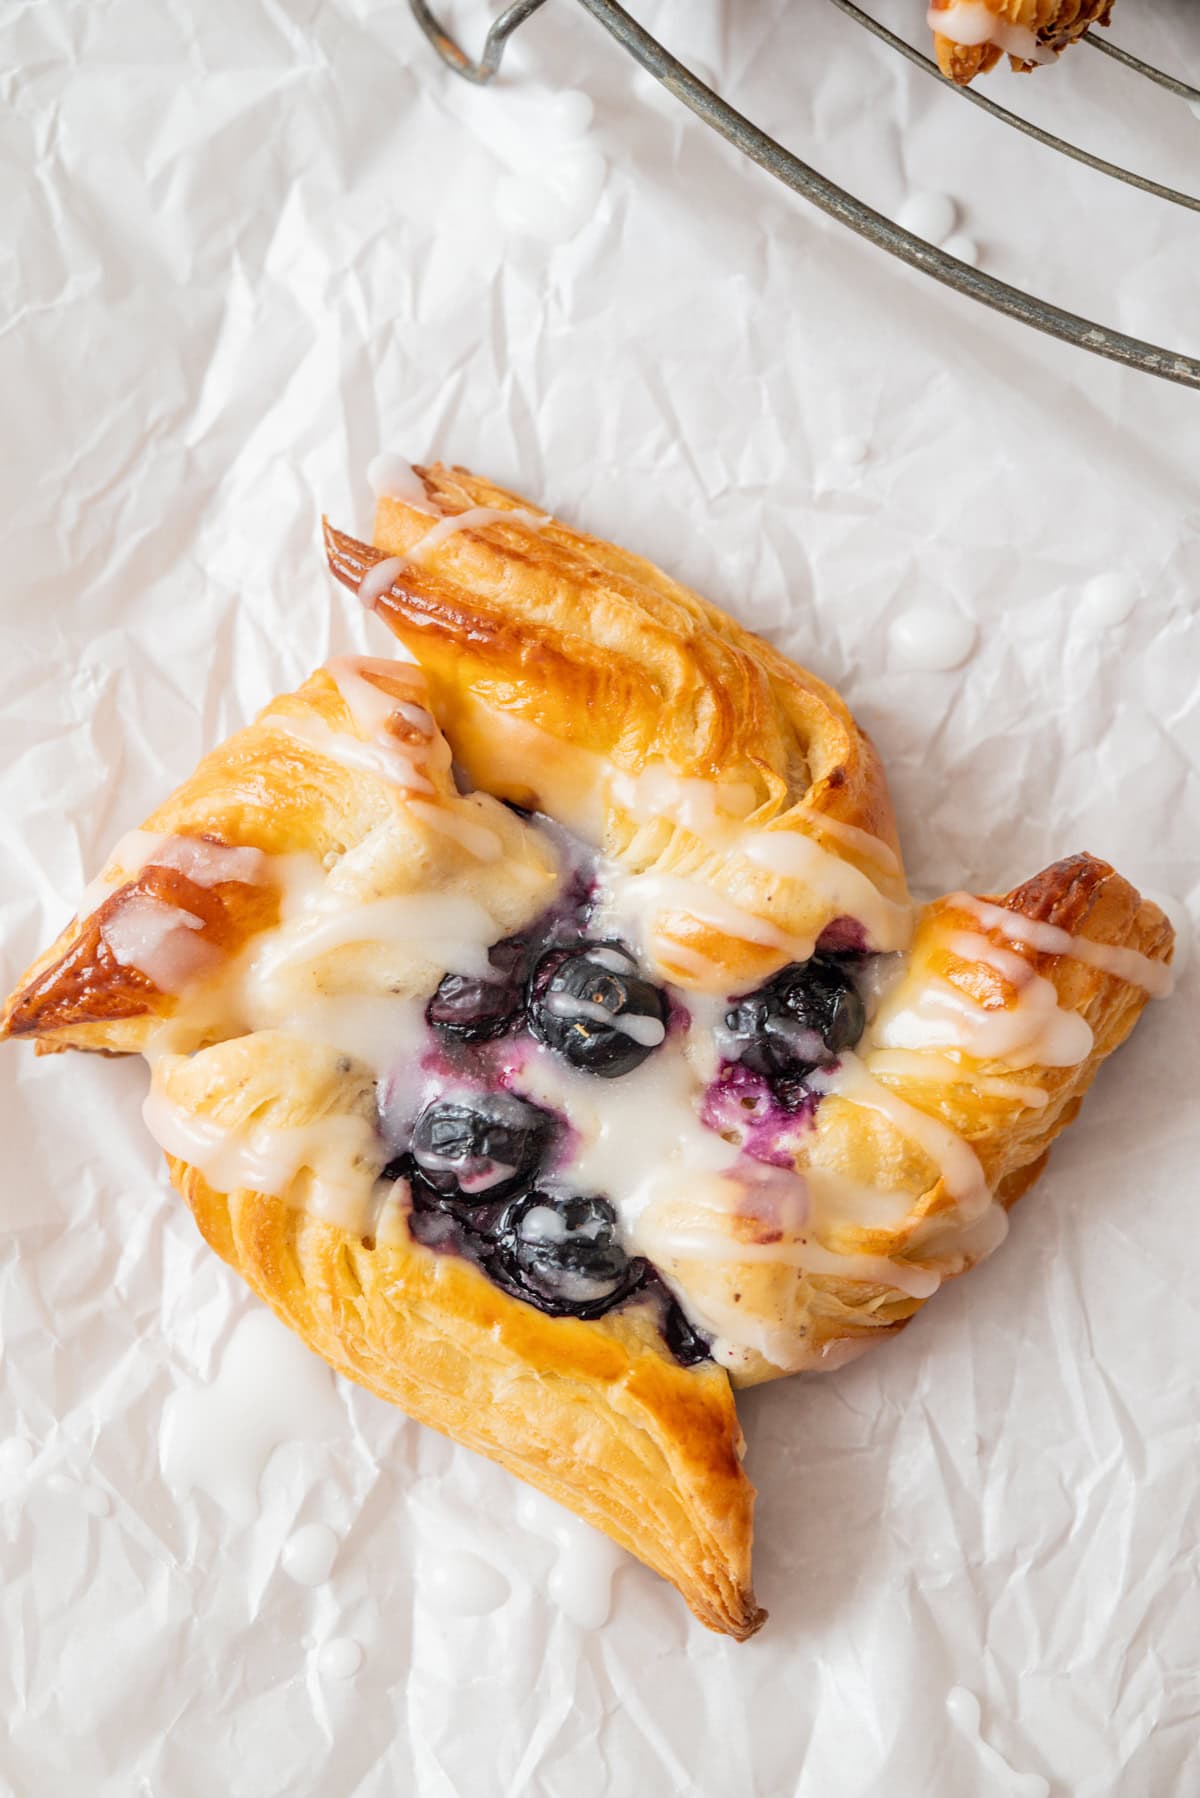
Sourdough Danish Pastries
These sourdough Danish pastries are buttery, flaky, and topped with your choice of sweet and fruity toppings. The laminated dough takes a little time, but the process is mostly hands-off. The dough is similar to my sourdough croissants, but it’s a touch more enriched, with milk, egg, and a hint of cardamom. That extra richness gives the pastries a slightly softer crumb while still keeping all those gorgeous flaky layers.

These sourdough Danish pastries were first published in 2021 and I’ve made them dozens of times since. Since I first published them I’ve honed in on my lamination and photography a bit more, so I thought it a good time to update with better step-by-step photos of the entire process. If this is your first time making laminated dough, I hope you find them helpful!
Temperature control is important for this one. The butter needs to stay cold and pliable throughout the lamination process, or you’ll end up with greasy, dense pastries rather than flaky ones.
The dough for these pastries is more enriched than croissant dough, with milk and egg added alongside the butter. I also love a little ground cardamom (freshly ground is best). It’s super subtle but adds a hint of floral warmth.

Baker’s Schedule
The night before: Feed your sourdough starter so it’s active and at peak rise by morning.
Day 1
- 9am: Mix the dough and leave it to bulk ferment for 3-5 hours.
- 1pm: Press the dough flat, wrap, and chill for 2 hours. Make the butter packet.
- 3pm: Fold 1, refrigerate 30 minutes.
- 3:35pm: Fold 2, refrigerate 30 minutes.
- 4:10pm: Fold 3. Place the dough in the fridge overnight.
Day 2
- Morning: Roll, cut, and shape the pastries. Leave to proof for 4-5 hours.
- Afternoon: Fill, egg wash, and bake.
Key ingredients and why
- Active sourdough starter: You need a fed and active starter at peak rise for this, not discard. The starter is the only leavening in the dough, so it needs to be full of active yeast to give the pastries any lift. I feed my starter the evening before at a ratio of 1:3:3, so it rises overnight and is ready to use in the morning. If your kitchen is warm overnight, go higher, like 1:5:5 so it doesn’t peak too early. You’ll use approximately 120g of active starter in total.
- All-purpose flour: A standard all-purpose flour works well here. You don’t need bread flour; the enrichment from the egg, butter, and milk gives the dough enough structure without extra gluten development.
- Milk and egg: The milk adds a gentle richness and softness to the crumb, and the egg gives the dough a little more strength and a beautiful golden colour once baked. I use whole milk for the best result.
- Butter: A small amount of softened butter goes directly into the dough, then a block of cold but pliable butter is folded into the dough three times to create the layers.
- Cardamom: This is optional, but I think it’s worth including. A small amount of freshly ground cardamom gives the dough a subtle warmth that’s very traditional in Scandinavian pastry. It’s not overpowering at all. If you love lots of cardamom though, you will love my Sourdough cardamom buns!
The Butter Packet
Getting the butter packet right is one of the most important parts of laminated dough. The goal is a cold, evenly shaped block of butter that’s pliable enough to bend without shattering but firm enough that it won’t melt into the dough the moment you start rolling. There are two ways to do it.
Method 1: Bashing cold butter (my preference)
Take 250g of cold butter straight from the fridge. Fold two sheets of parchment paper into a 15x20cm (6×8 inch) rectangle to use as a frame. Place the cold butter inside and use a rolling pin to bash it firmly, working across the whole block until it starts to flatten and become more pliable. Then roll it out until it fills the frame evenly, then chill it.
This method gives you cleaner, more defined layers because there’s nothing in the butter to interfere with how it separates from the dough in the oven. When you work cold butter like this, the fat crystals soften and reorganise, making it behave like firm clay rather than crumbling. It takes a bit more muscle but the result is worth it.
Method 2: Softened butter with flour
Leave 250g of butter at room temperature until softened. Mix in 1½ tablespoons of all-purpose flour until combined, then roll it out between two sheets of parchment paper into a 15x20cm (6×8 inch) rectangle. Chill until cold.
The flour makes the butter a little more stable and forgiving to work with in a warm kitchen. This is a good option if your kitchen runs warm or if you’re newer to lamination and want a bit more margin for error. The layers will still be flaky and delicious, just slightly less defined than with the pure butter method.
In both cases, once the butter has chilled and you’re ready to use it, give it a few bashes with the rolling pin again to make it pliable before encasing it in the dough. It will have firmed back up in the fridge and needs to be worked back to that cold but bendy consistency. If it cracks when you press it, it’s still too cold. Leave it on the bench for 5 minutes and try again. If it’s soft or greasy, it needs more time in the fridge.
Method
This is a visual overview of how to make these danishes. For the full recipe, head to the recipe card at the bottom of this post.
Dough
- Feed your starter the evening before. Feed at a ratio of 1:3:3, or up to 1:5:5 if your kitchen is warm, so it rises slowly overnight and is at peak rise by the time you’re ready to mix the dough the next morning.

- Whisk the active starter into the milk and water until loosened.
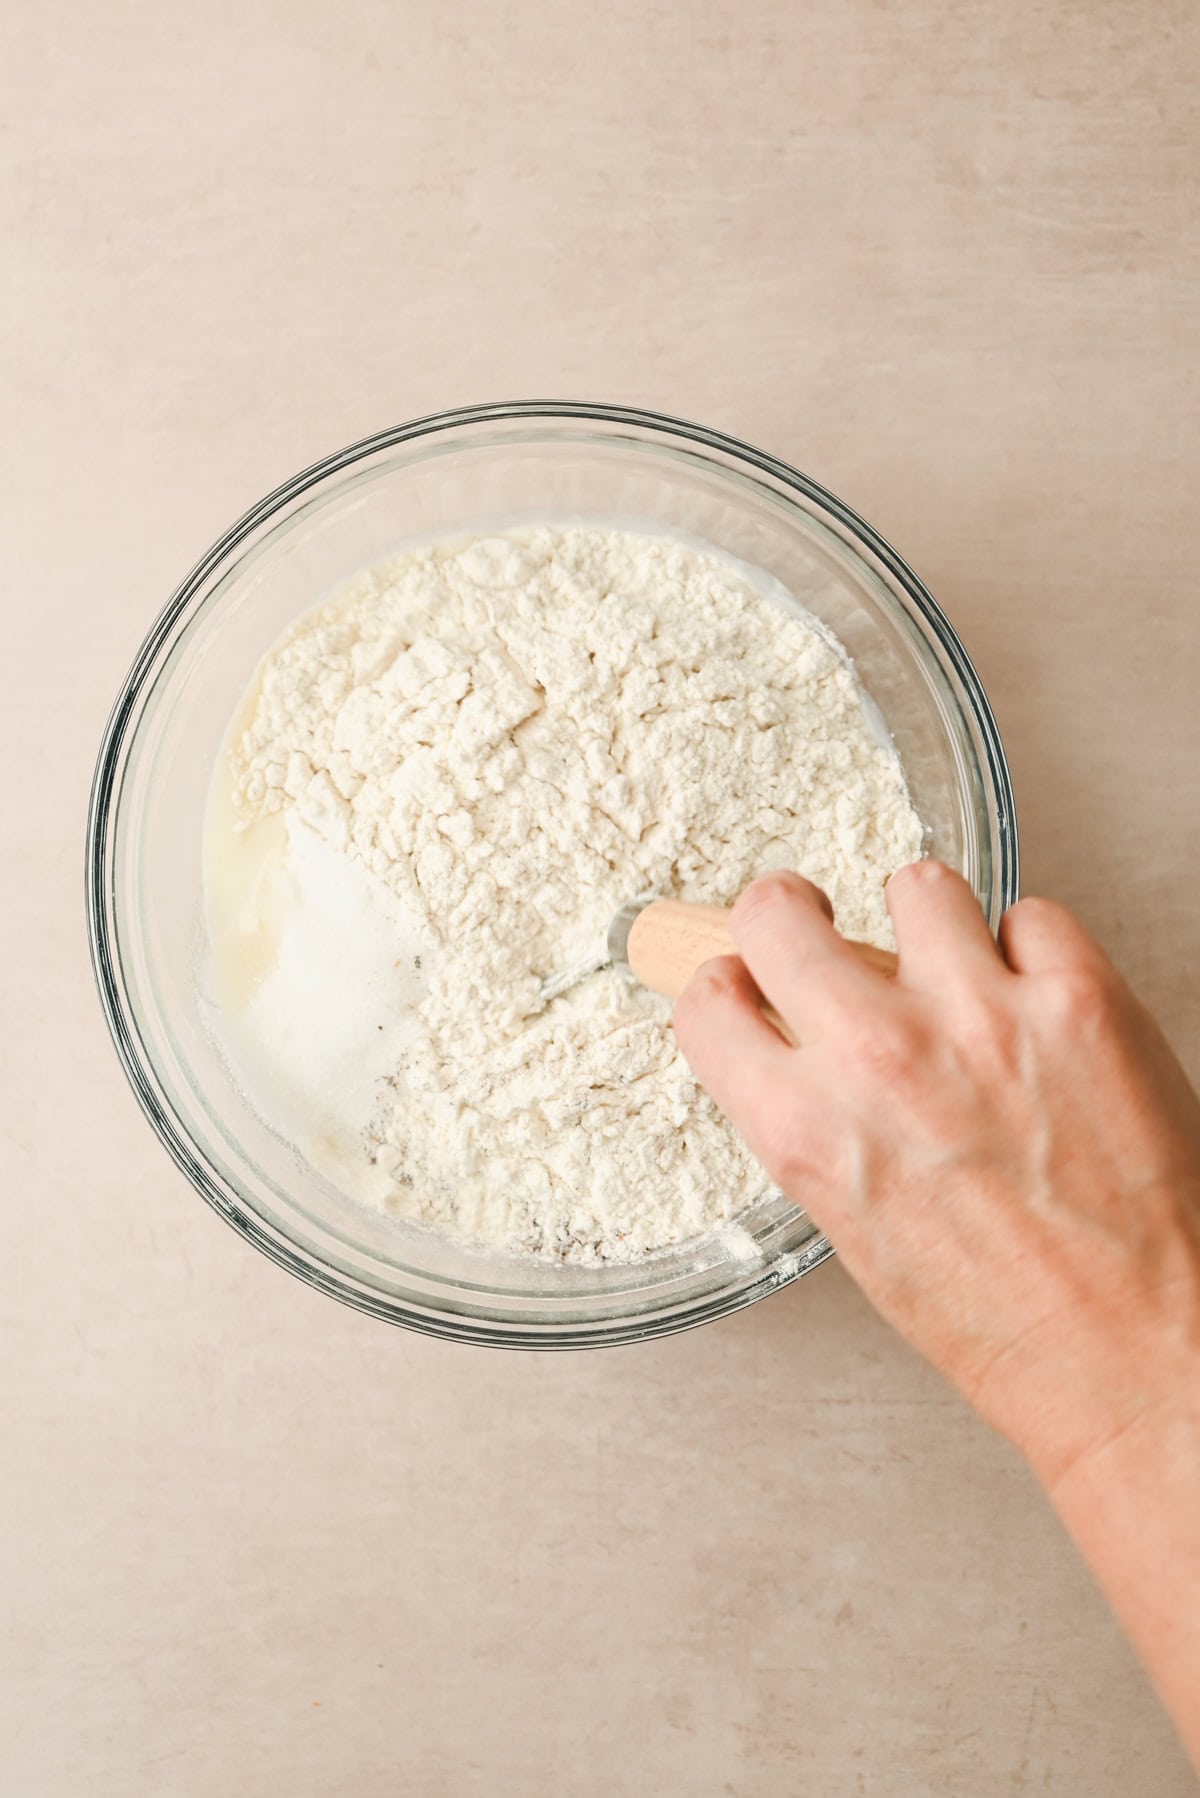
- Add the flour, egg, sugar, salt, and cardamom and mix until a dough forms, about 3-4 minutes.
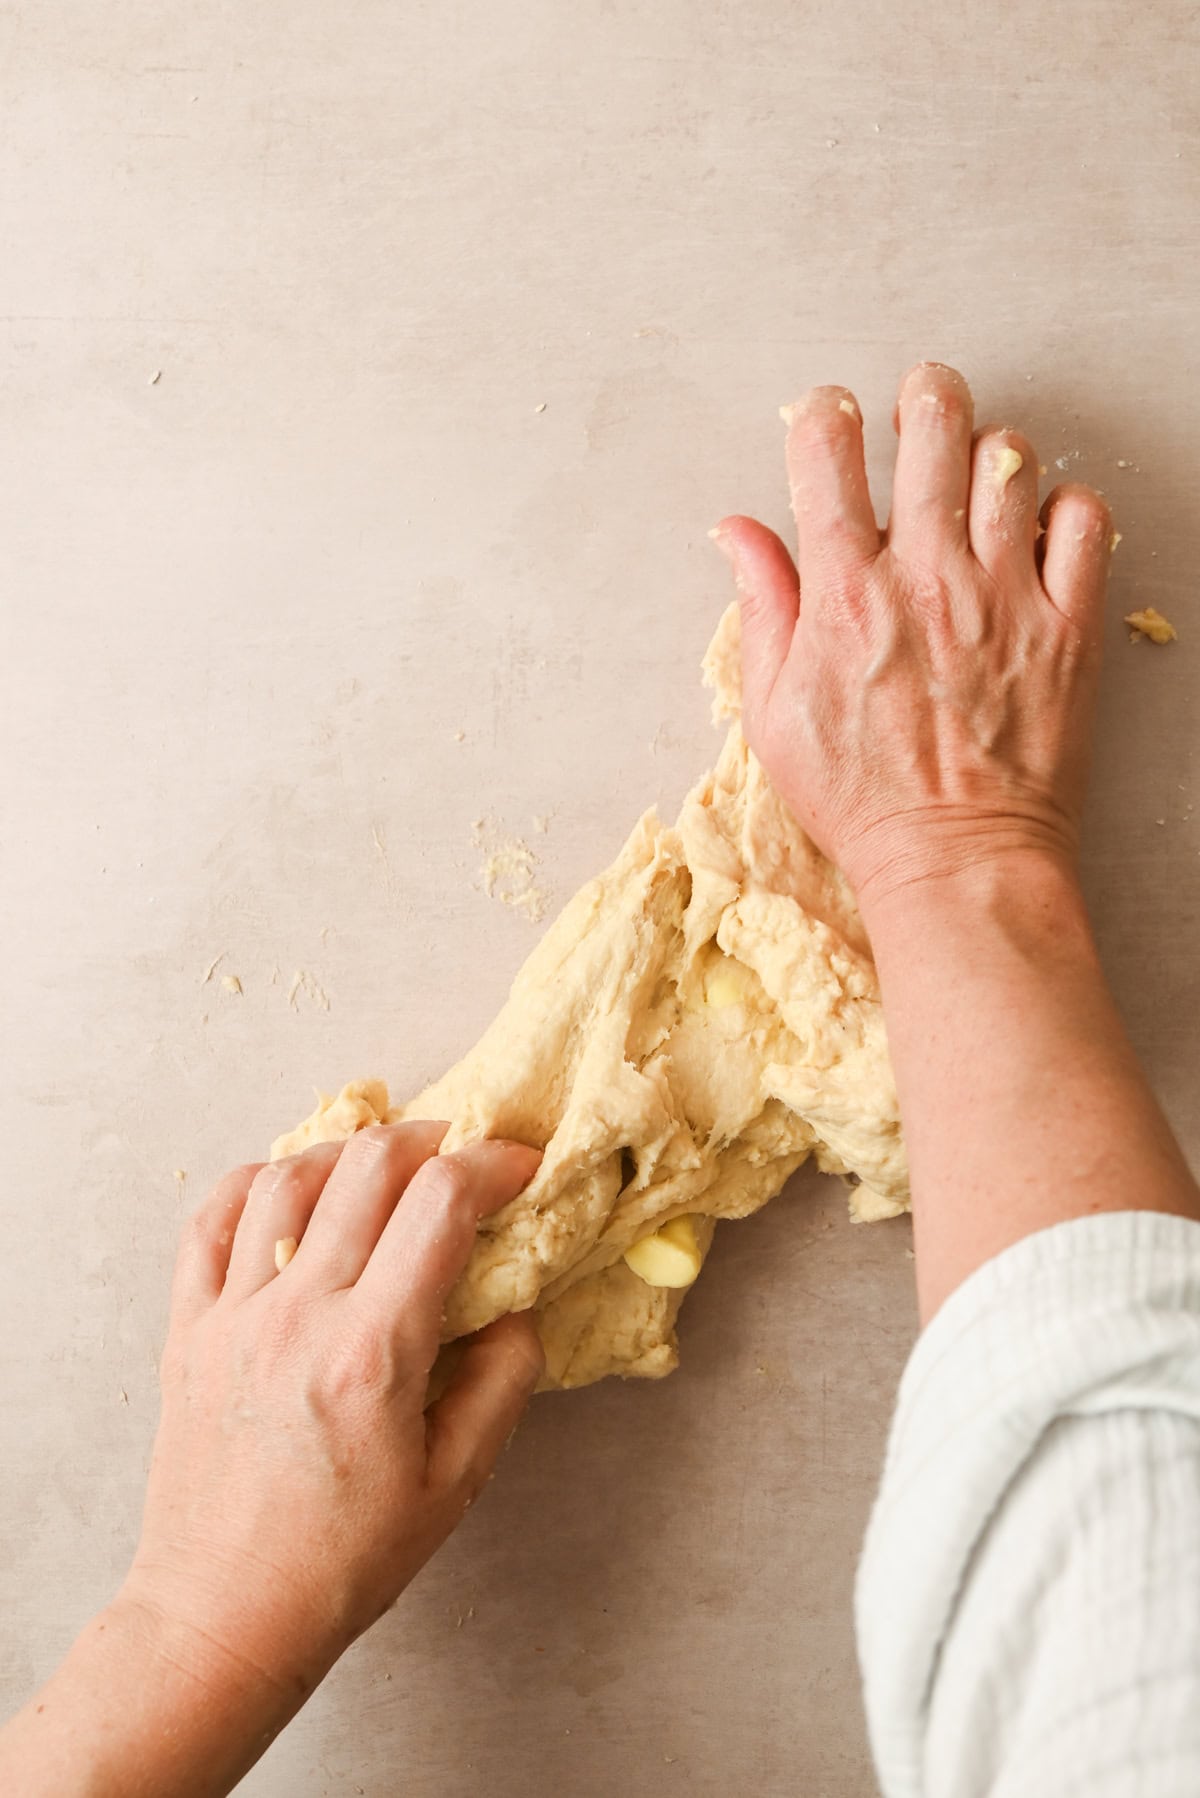
- Tip onto the bench and work in the softened butter, kneading until the dough is smooth. Add to a bowl, cover and ferment until risen by around 30-40%.
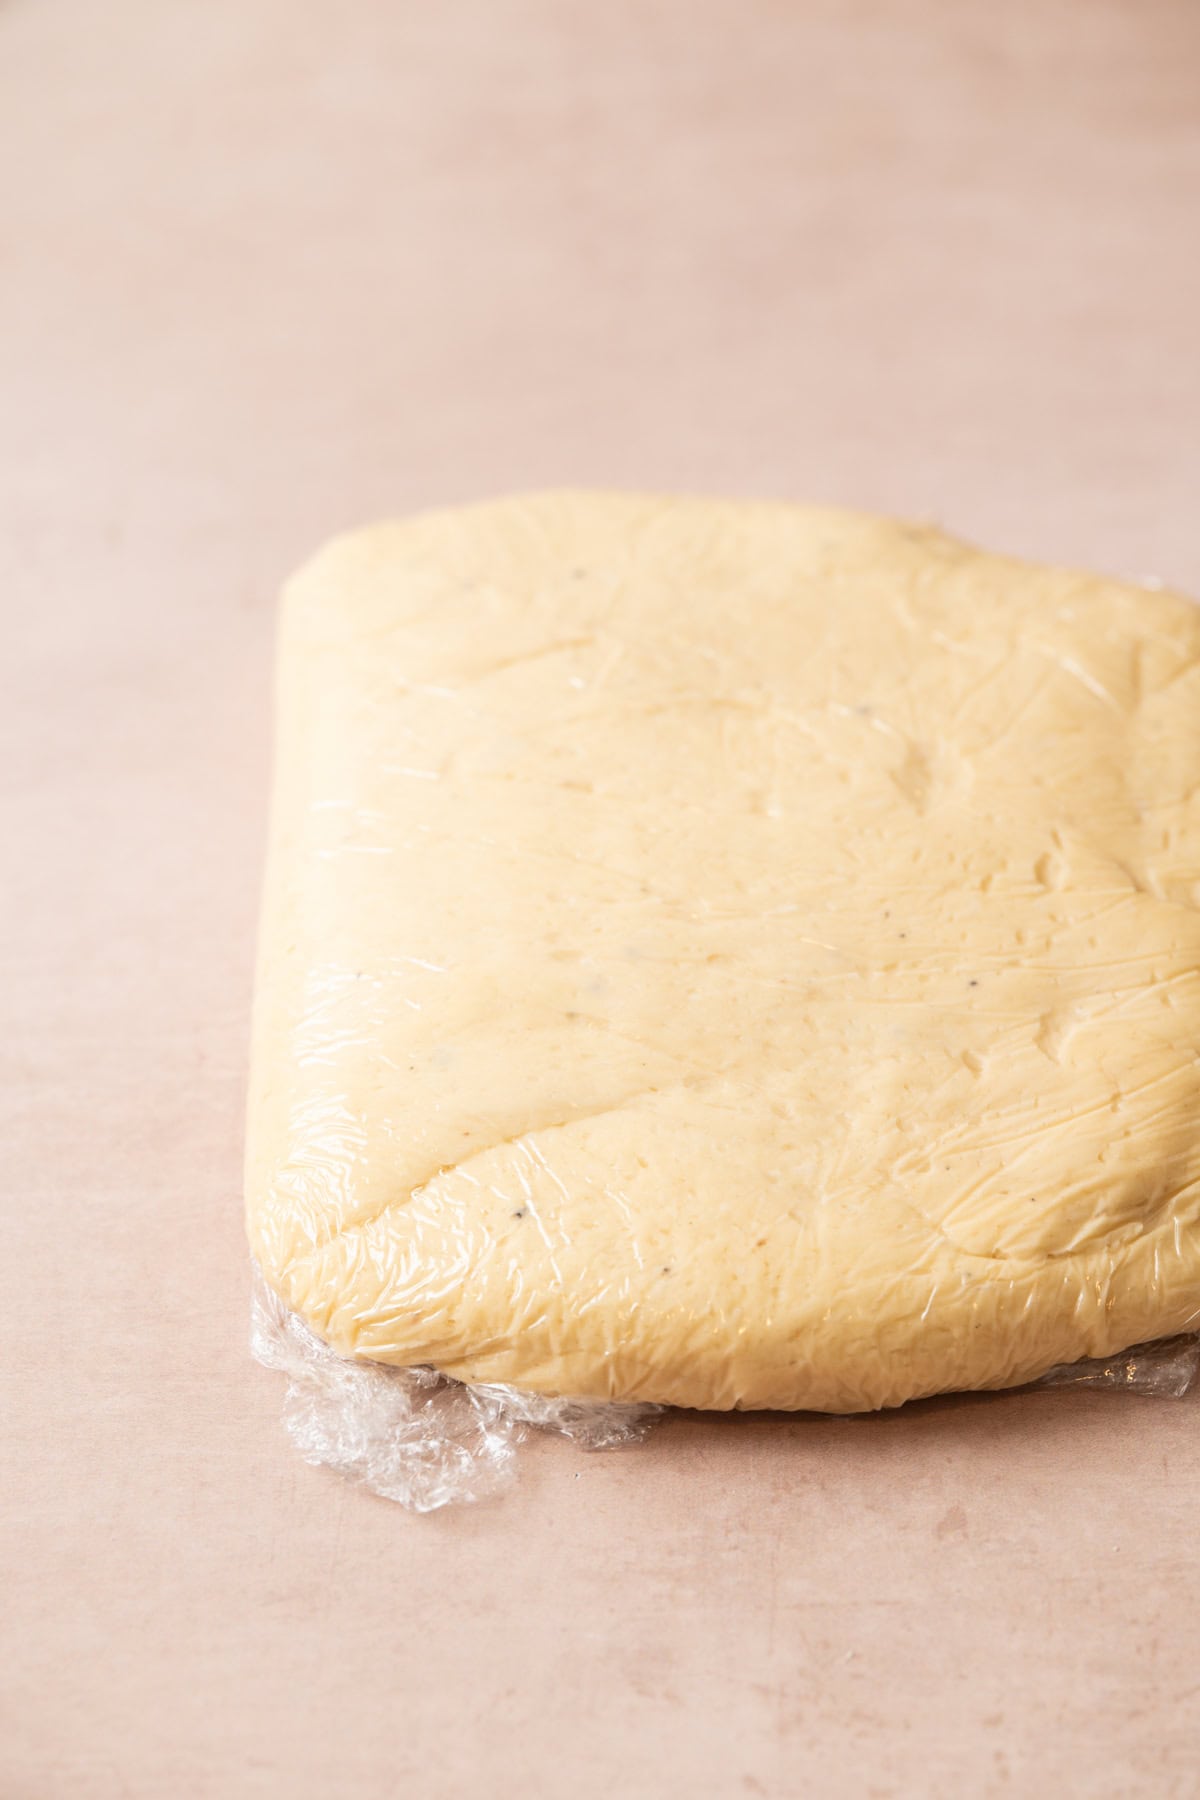
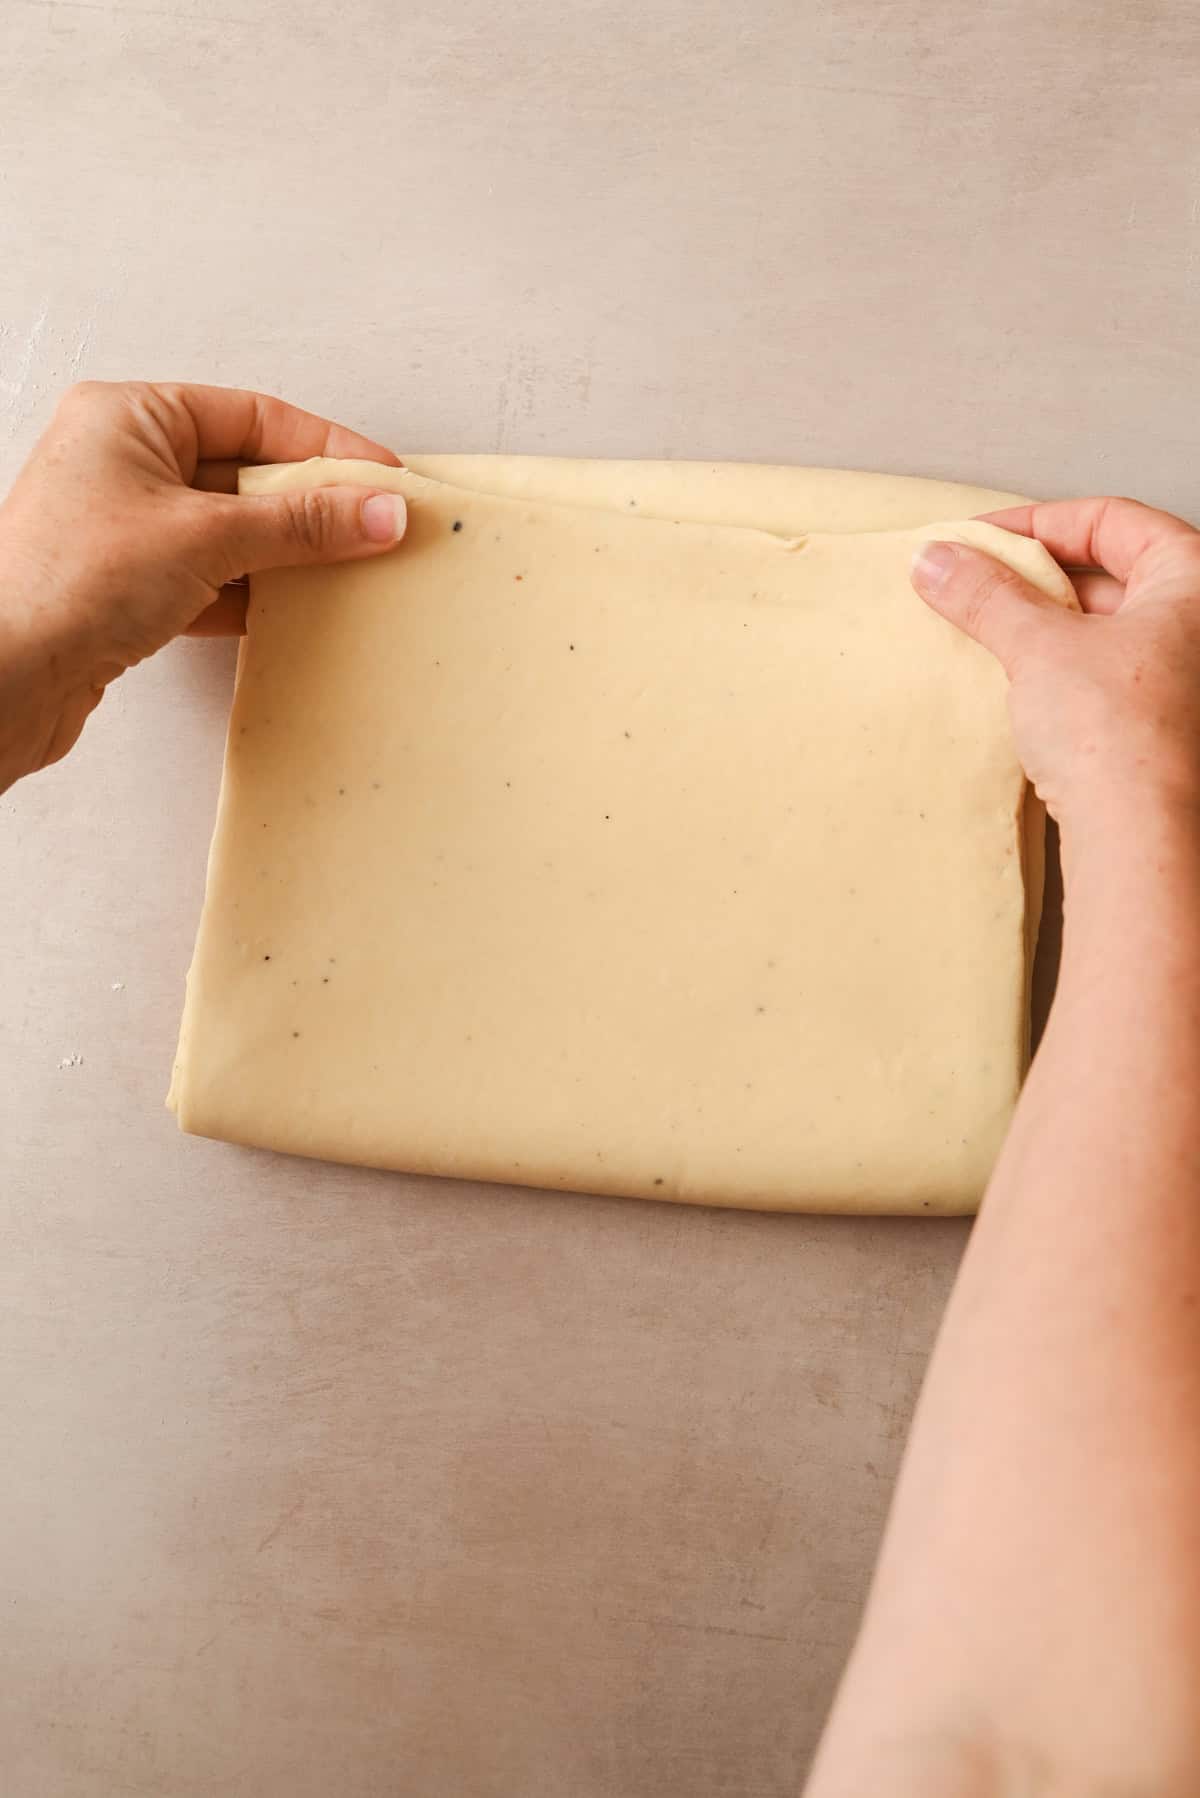
- Punch down the dough, and press it gently into a flat rectangle. Wrap it tightly, and refrigerate for at least 2 hours.
Butter packet

- Slice the cold butter and arrange the pieces in a grid on a sheet of parchment paper so they sit snugly together. Place a second sheet of parchment on top and use a rolling pin to bash and roll the butter into an even, flat block.
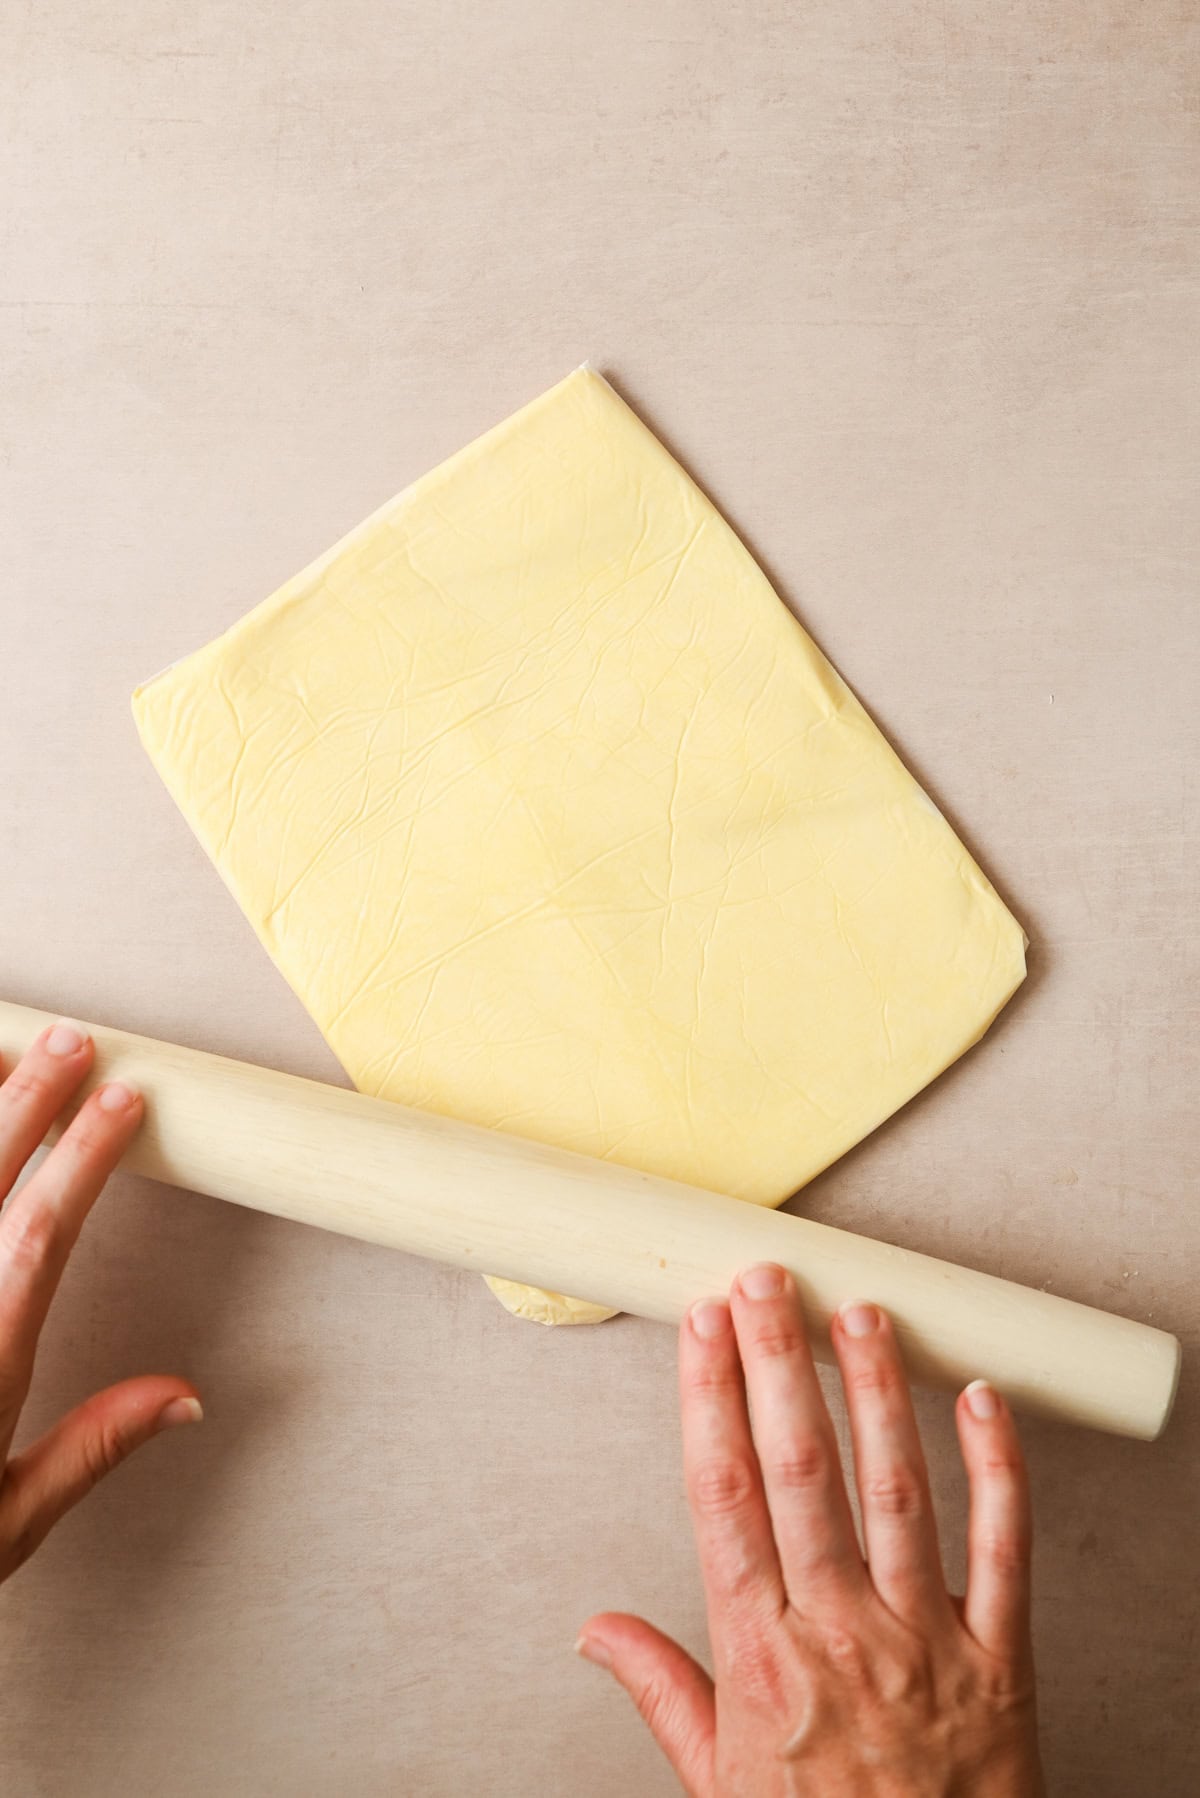
- Use the parchment to fold the edges into a neat 15x20cm (6×8 inch) rectangle, pressing the butter to fill the frame evenly. Chill until cold. See the butter packet section above for a full explanation of both methods.
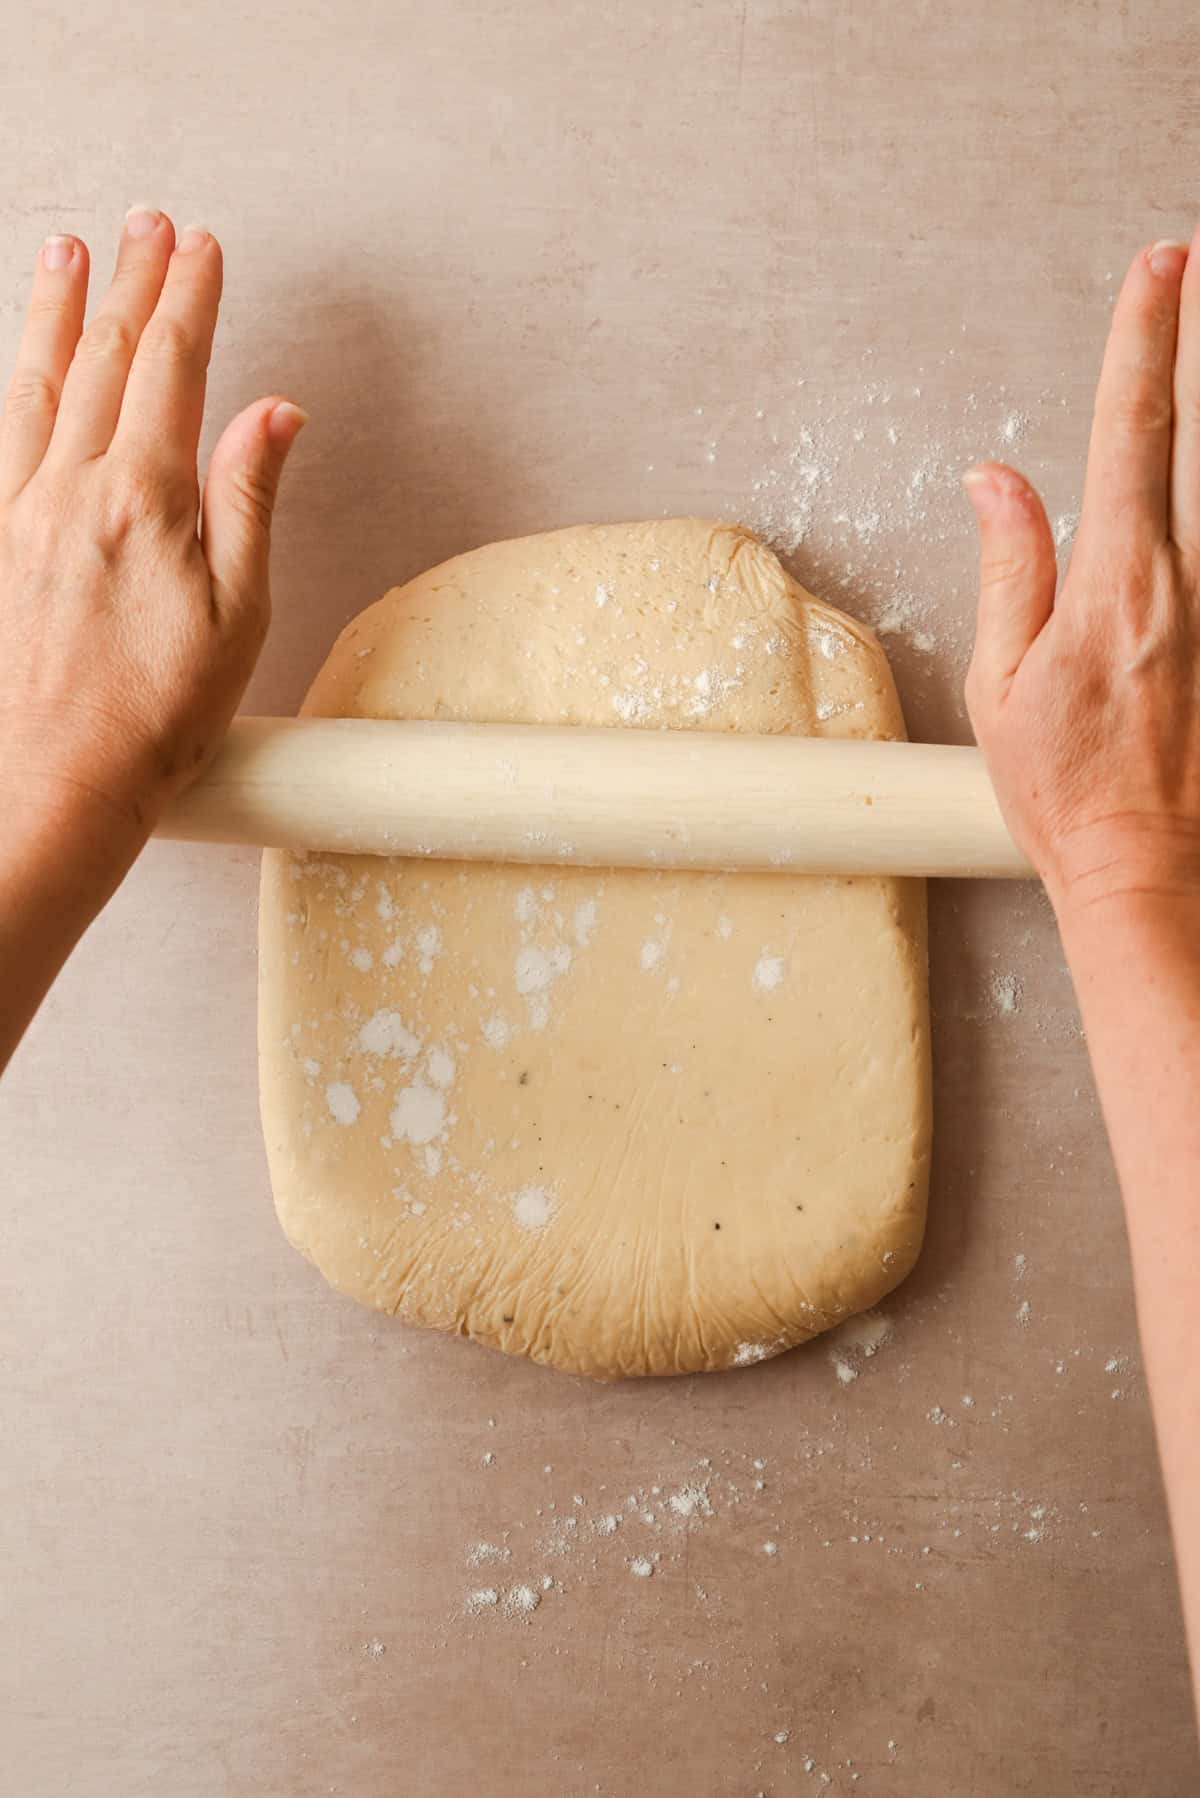
- Roll the chilled dough into a 20x30cm (8×12 inch) rectangle.
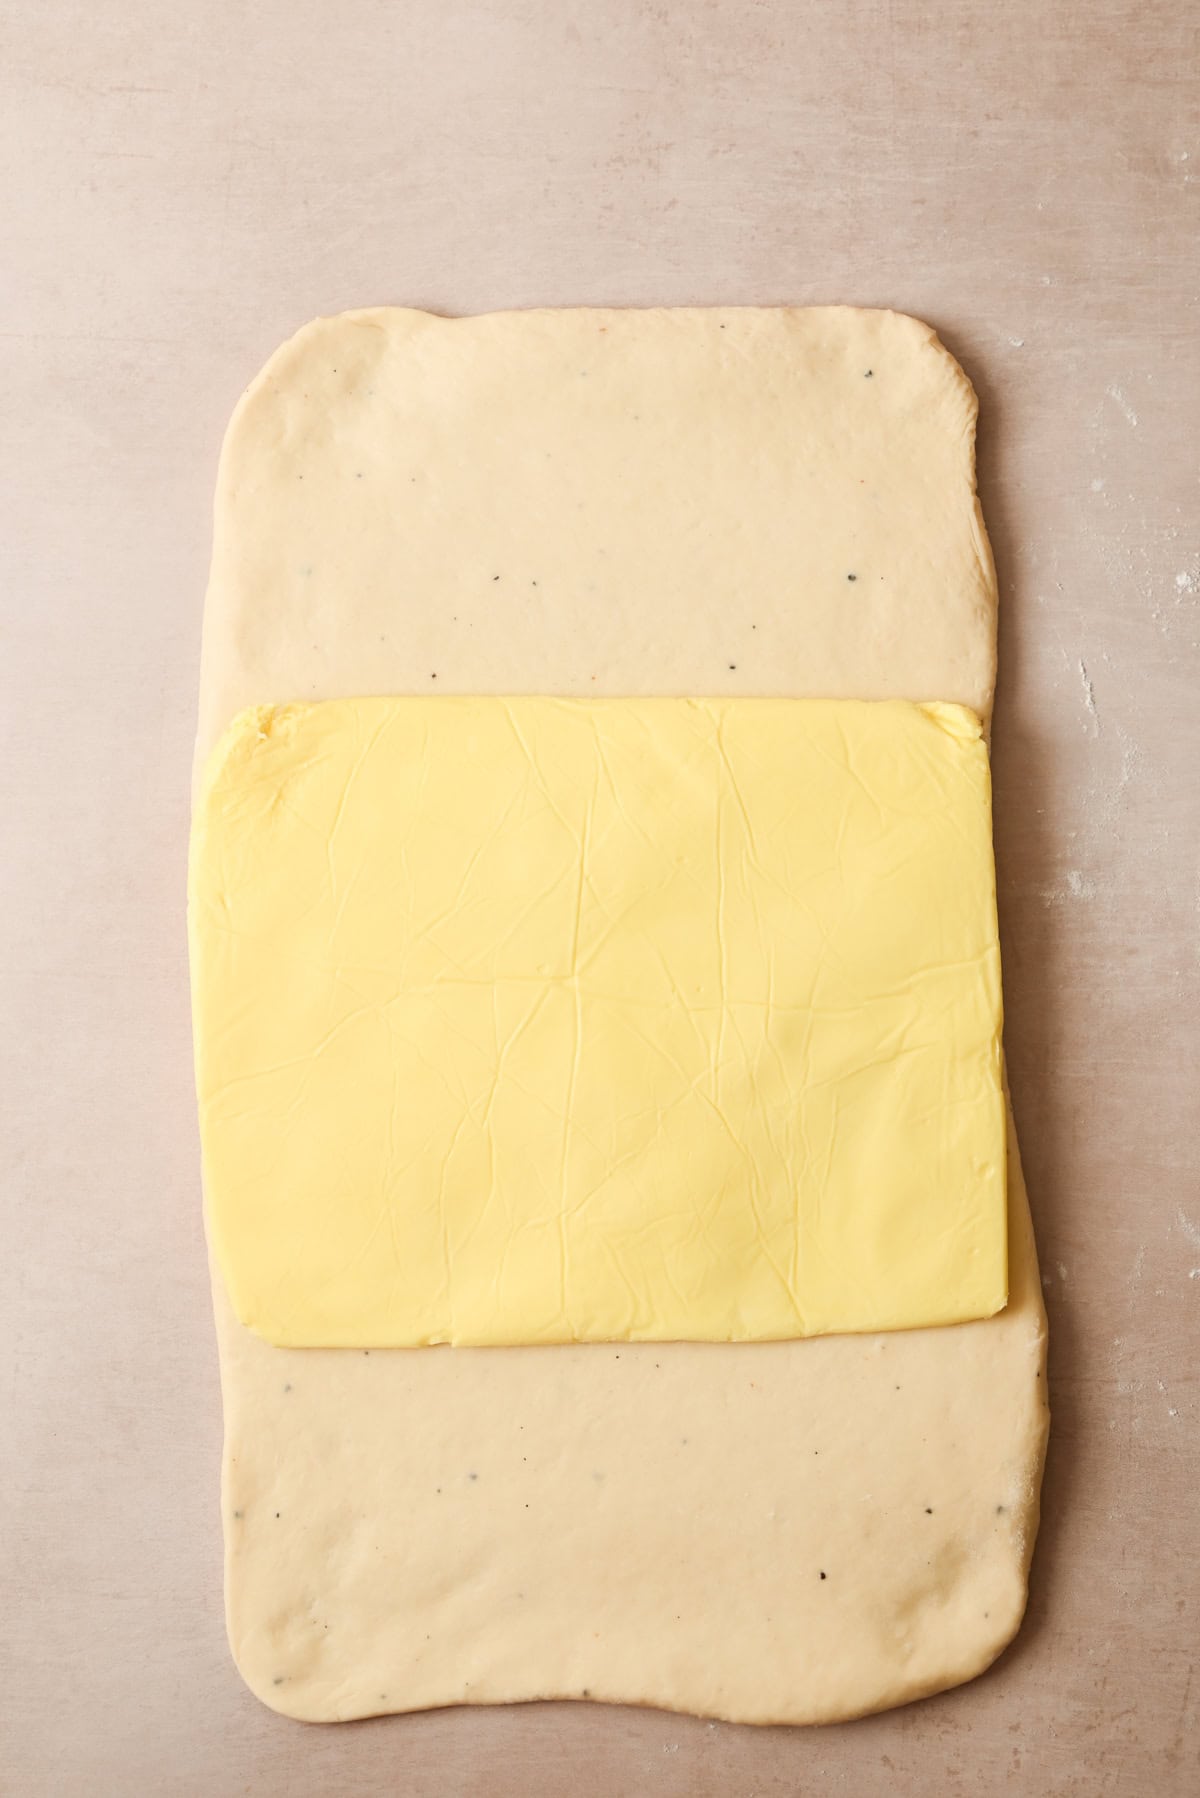
- Place the butter in the centre.
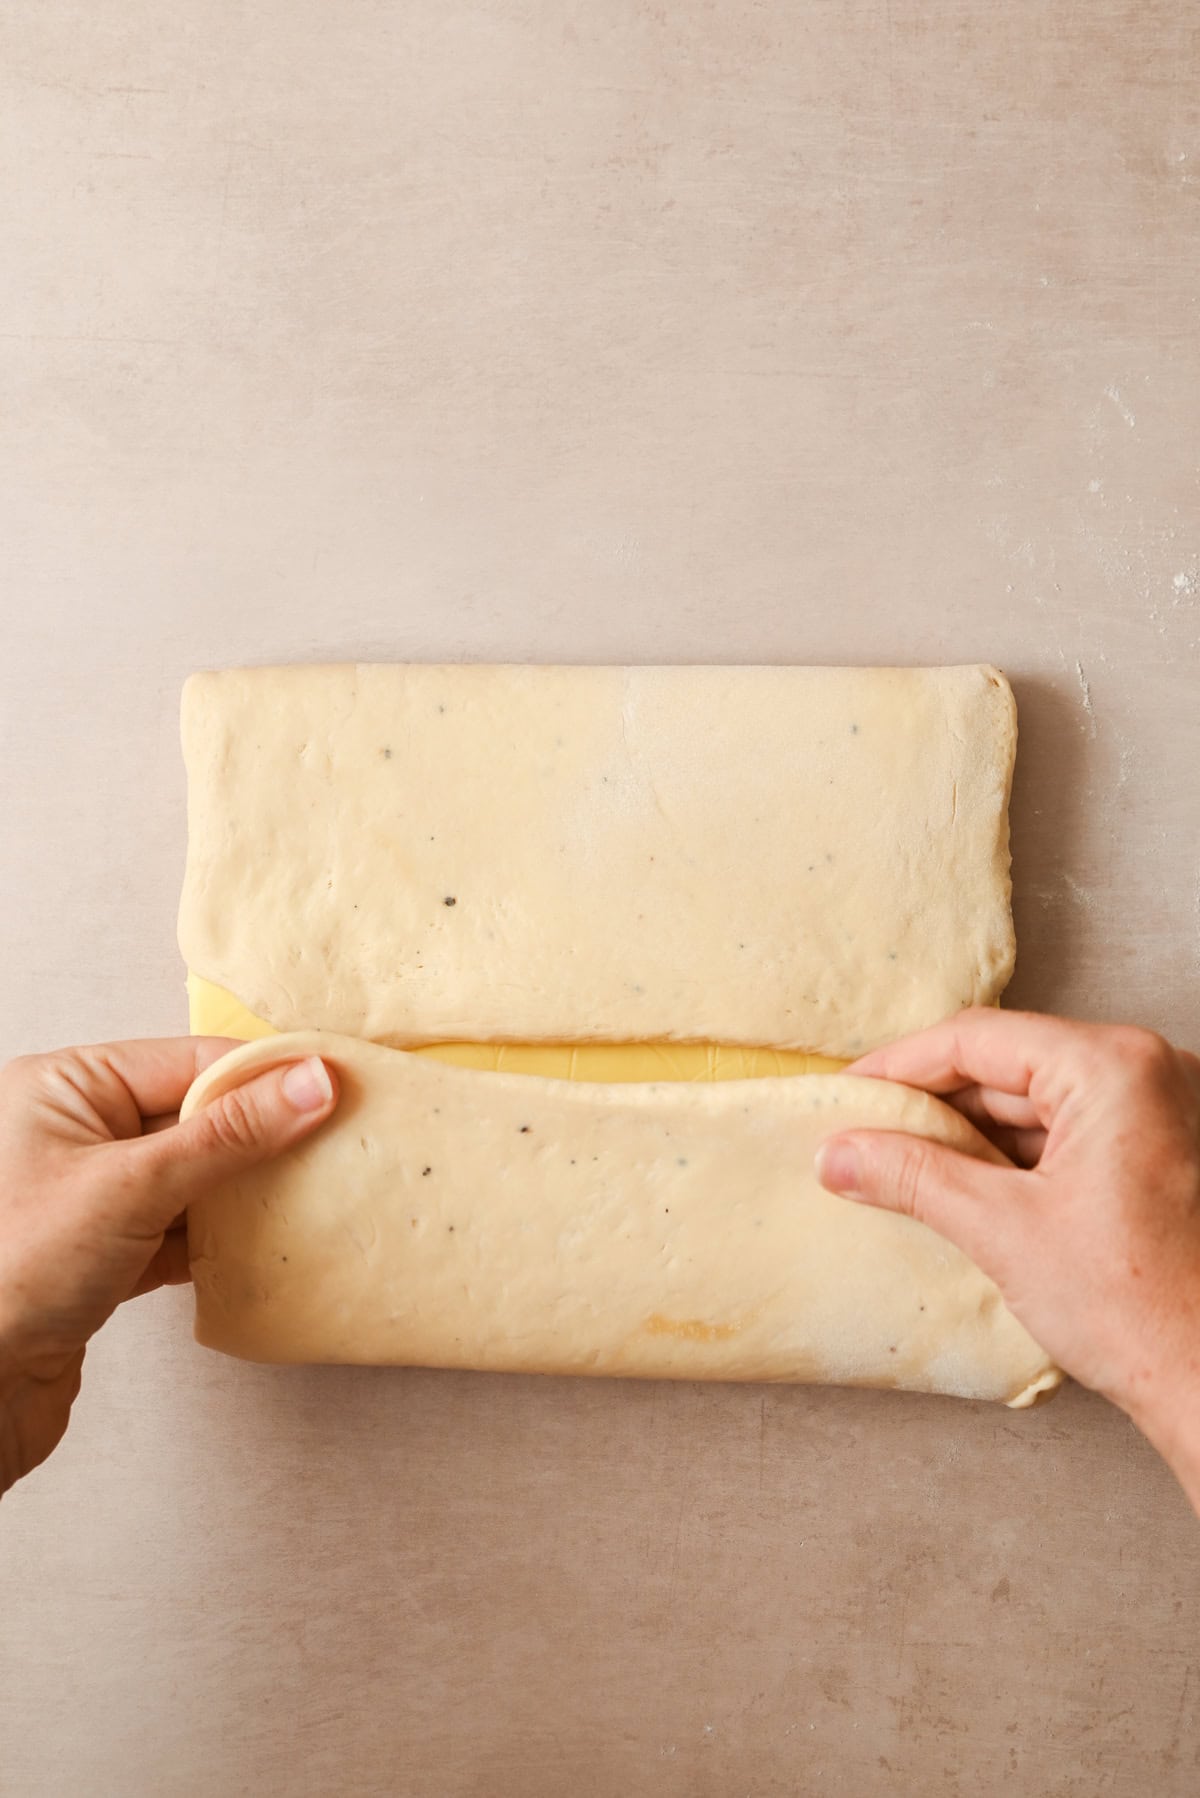
- Fold the dough edges up and over to encase it completely. Pinch the edges to seal, then turn it 90 degrees.
- Make a very shallow slit along each long edge of the dough with a sharp knife to relieve any tension in the dough that might cause it to spring back or tear when you start rolling.
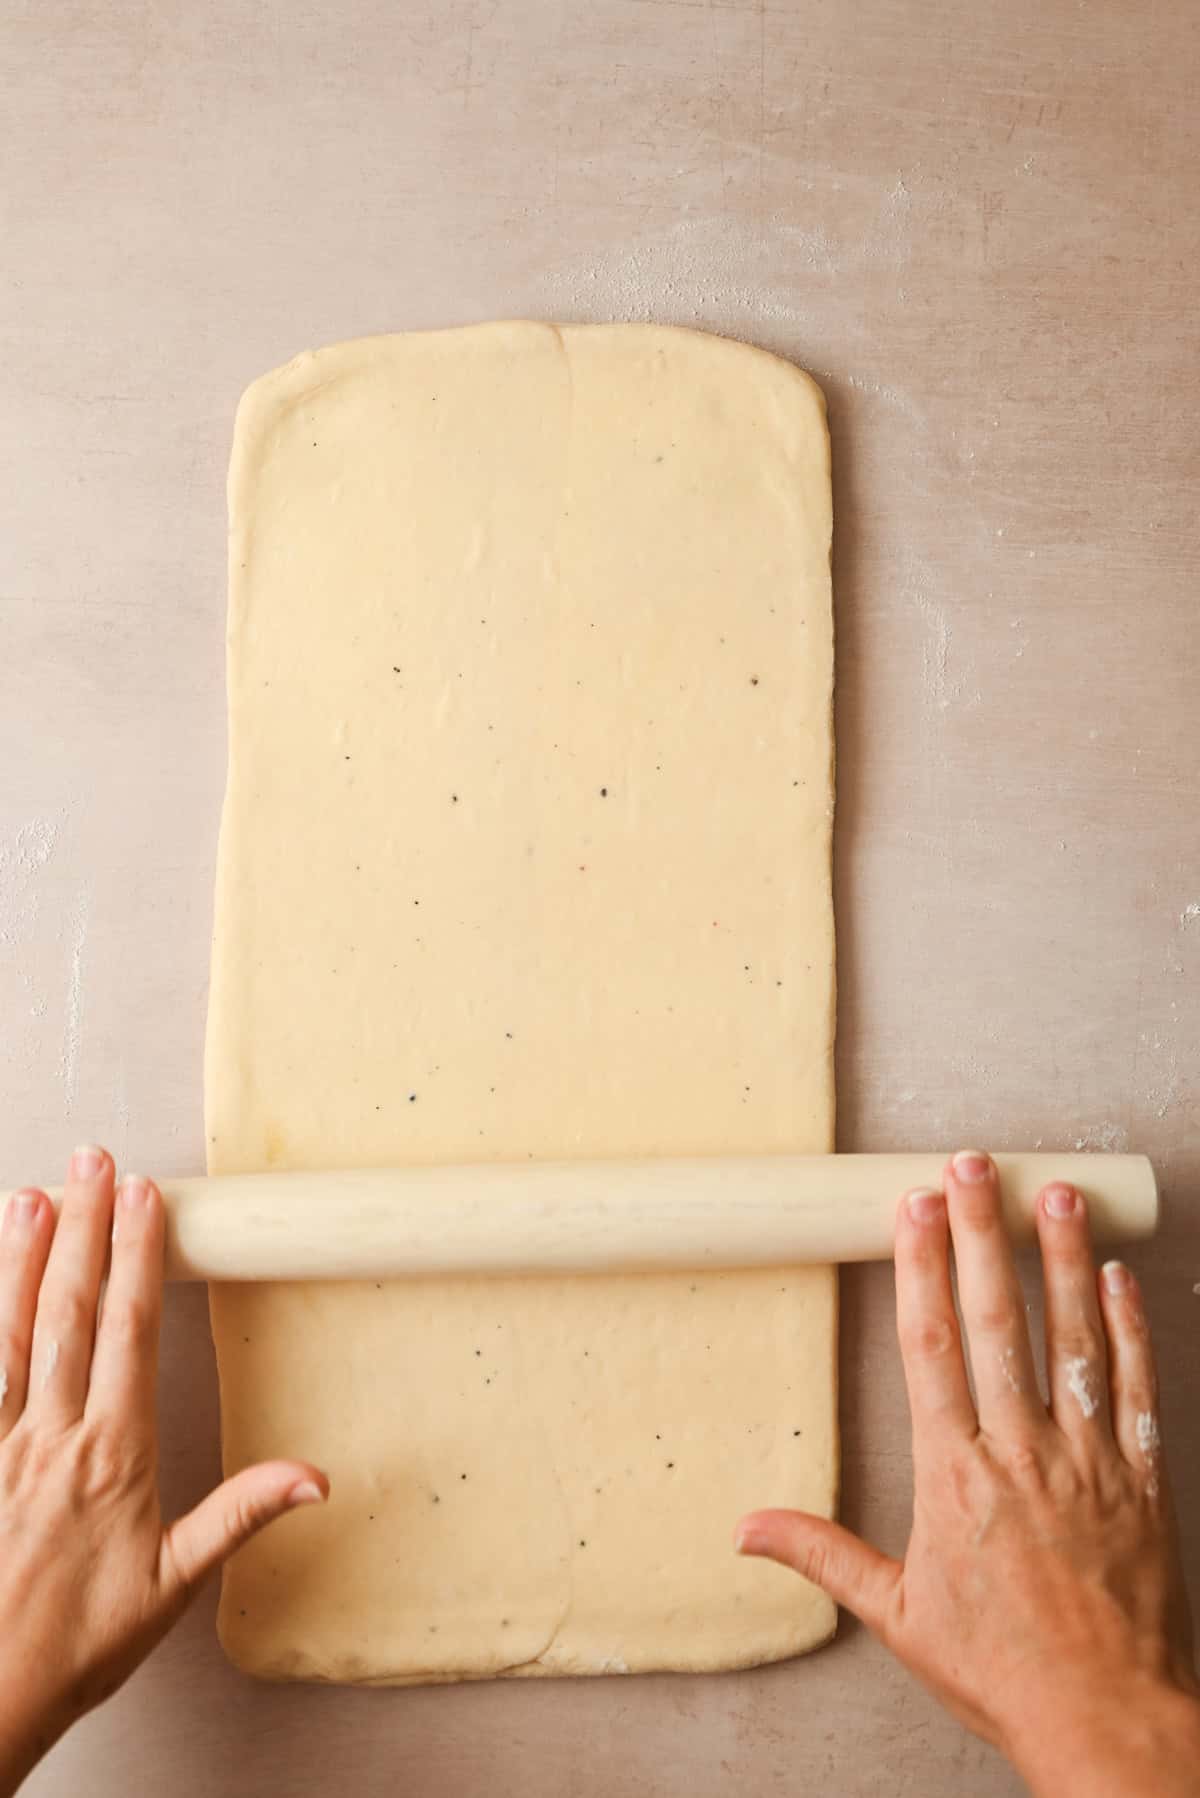
- Roll the dough out to around 8mm thick, focusing on length and thickness rather than width.
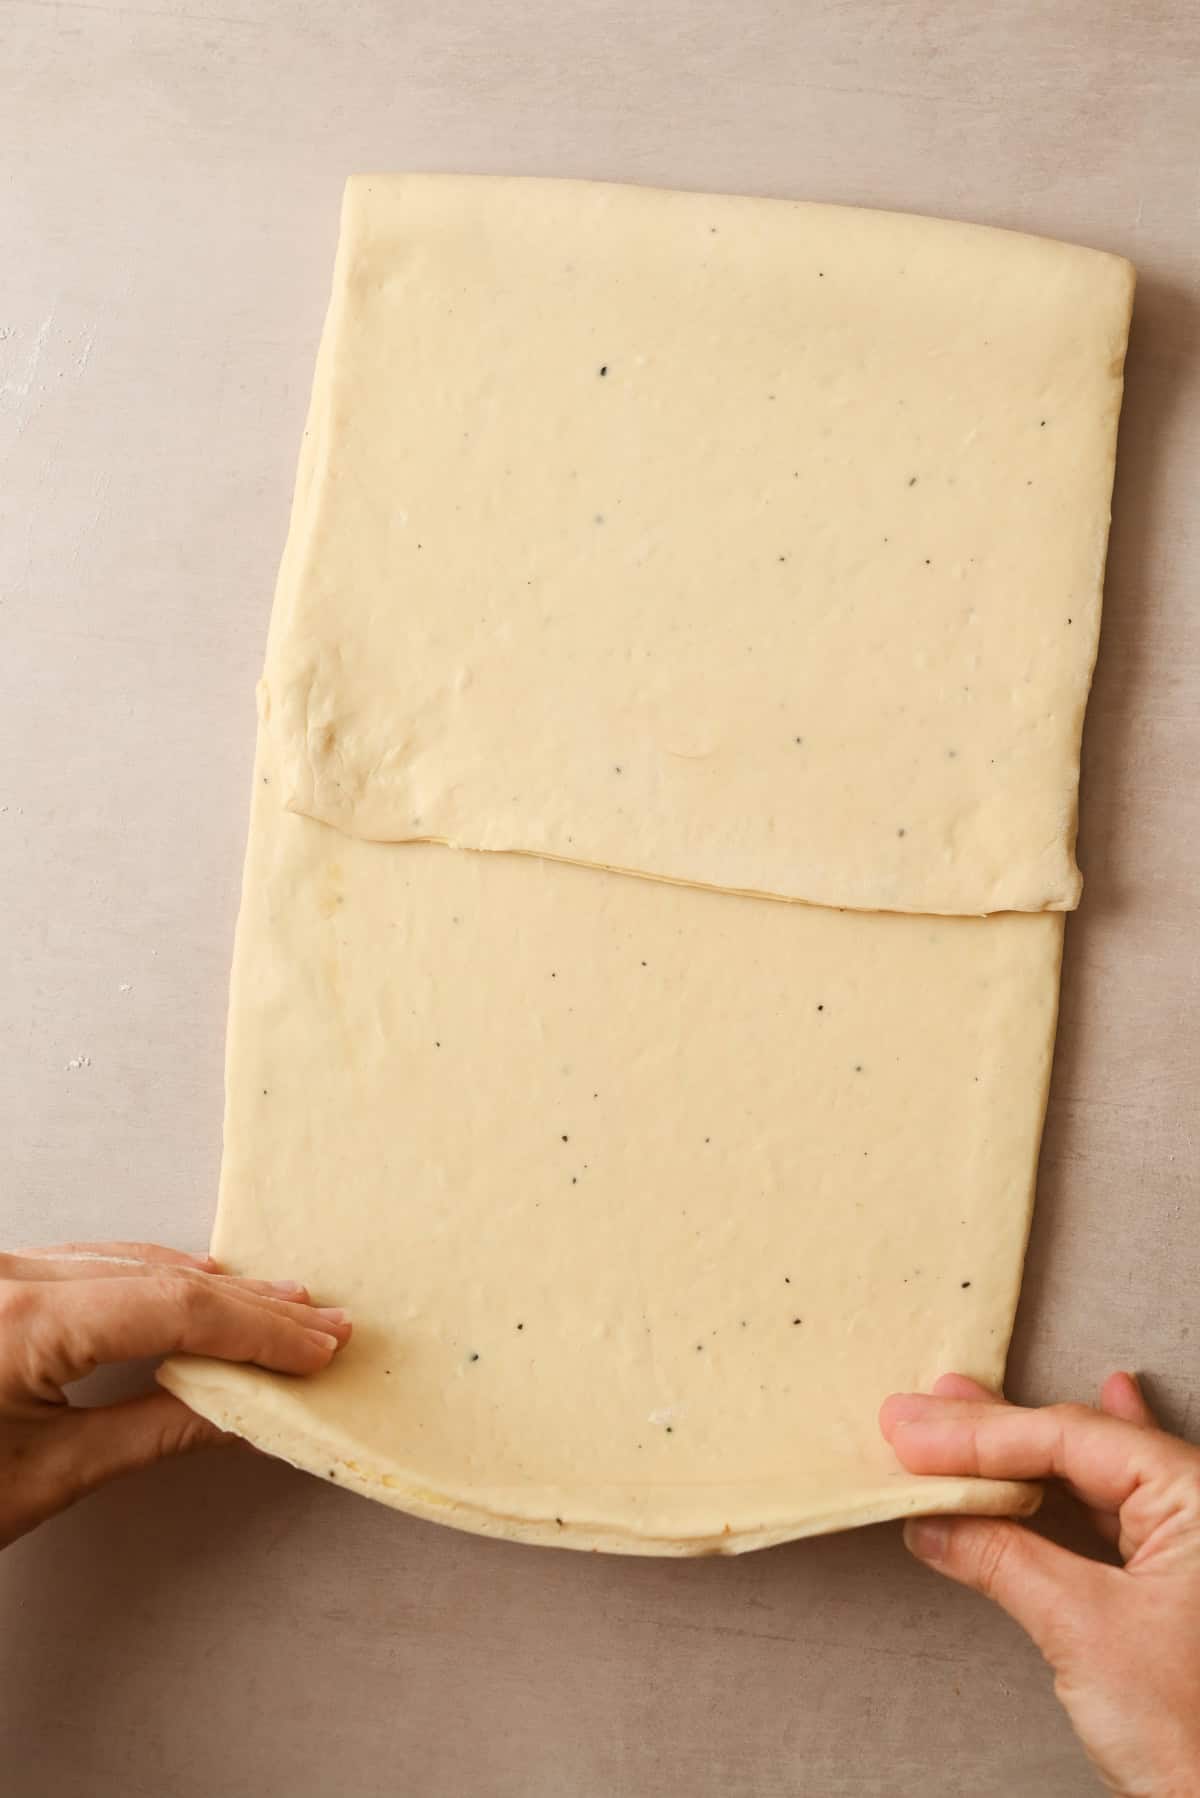
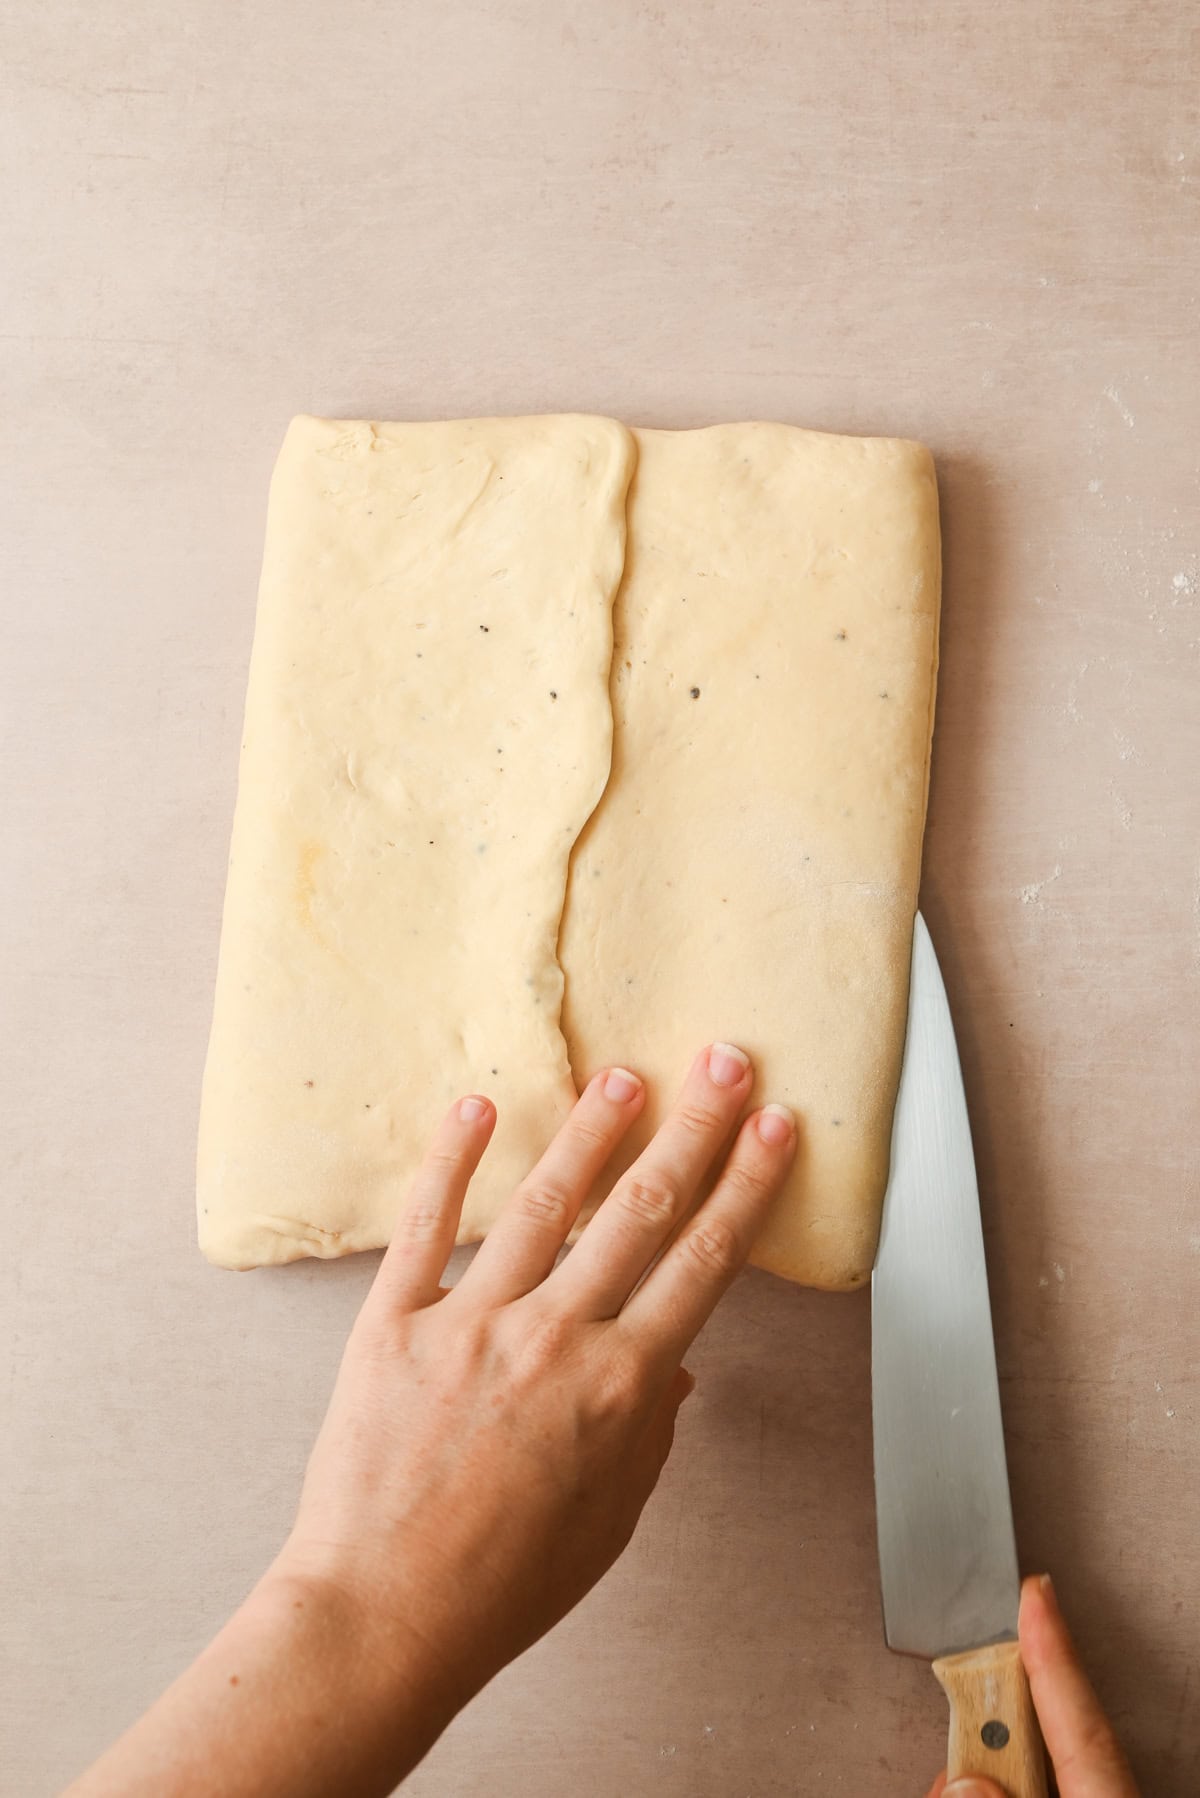
- Trim the uneven short ends with a sharp knife and brush off any excess flour. Fold the dough into thirds like a letter. Wrap and refrigerate for 30 minutes.
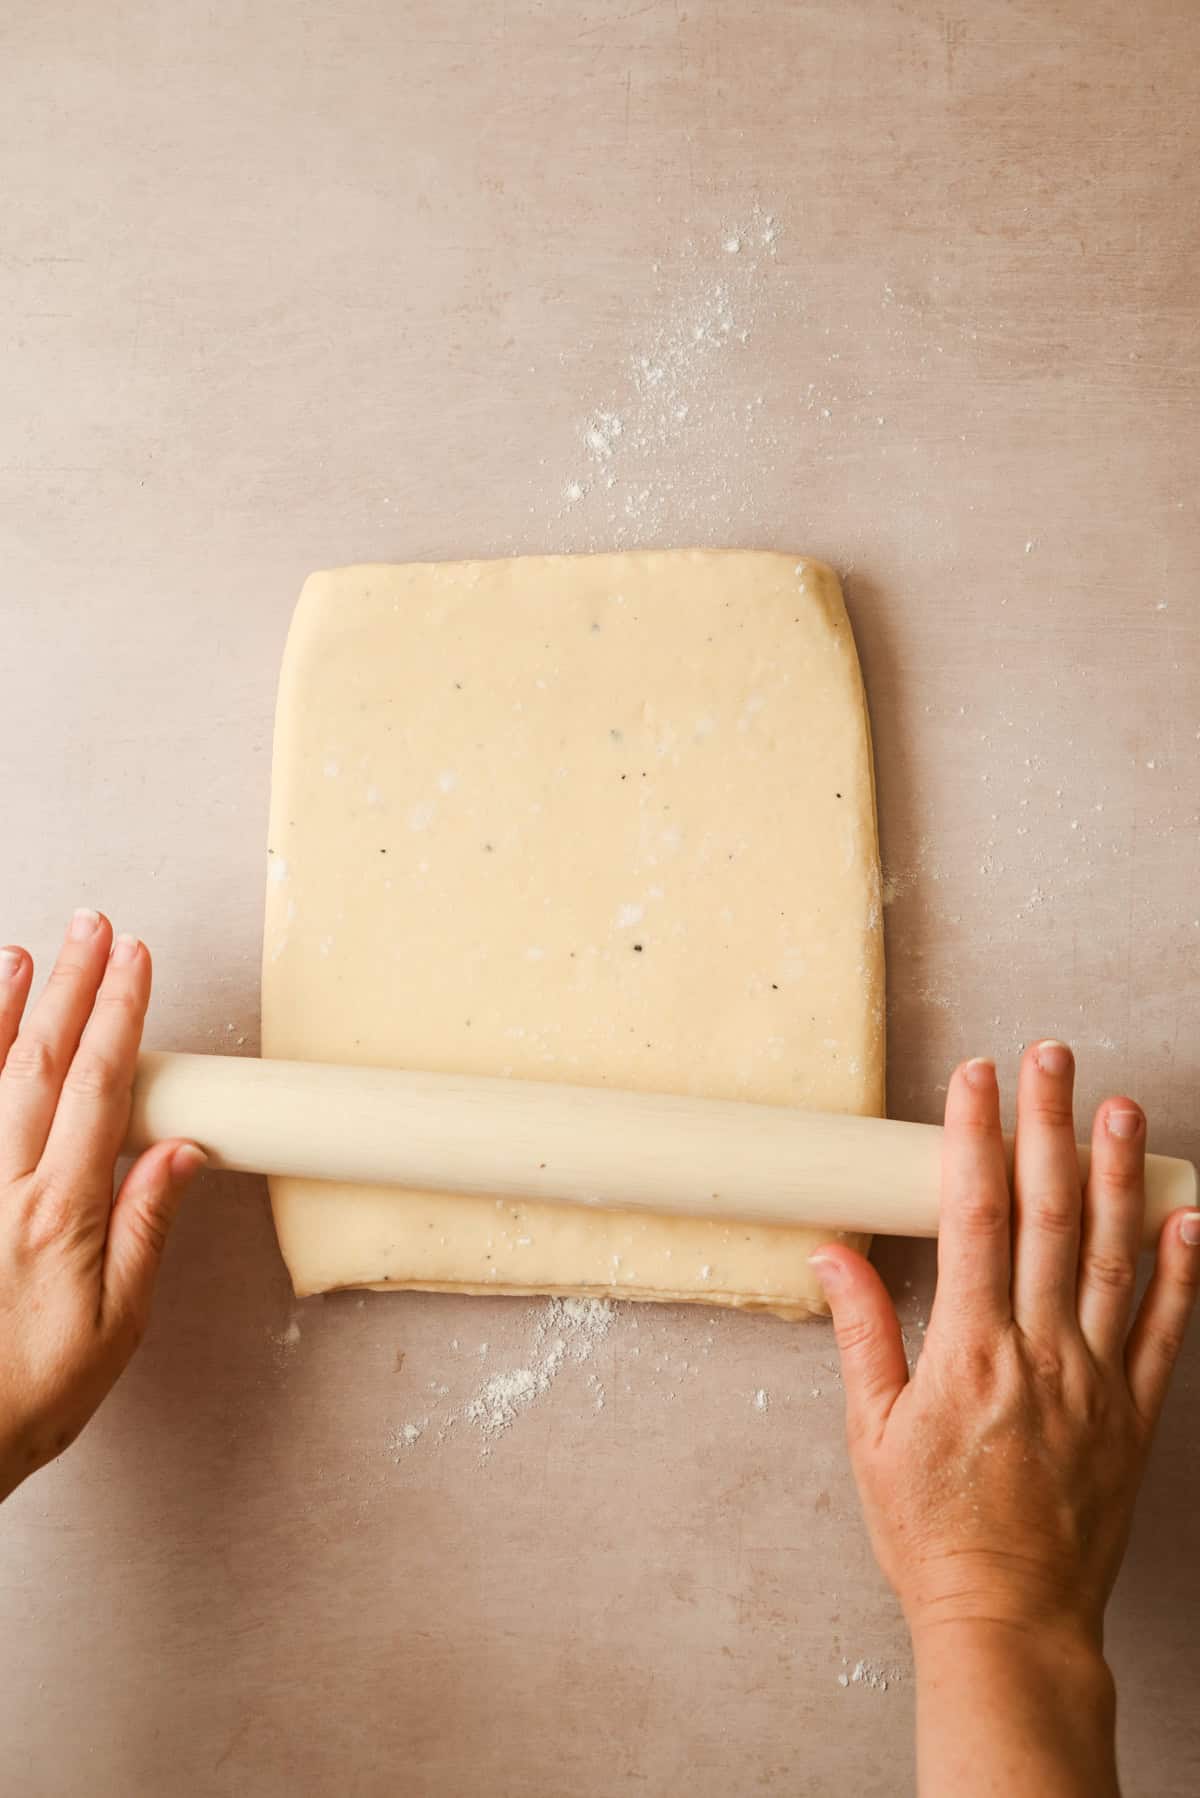
- Repeat this fold two more times for three folds total, trimming and brushing between each one.
- After the final fold, refrigerate overnight (at least 8 hours).
Shaping
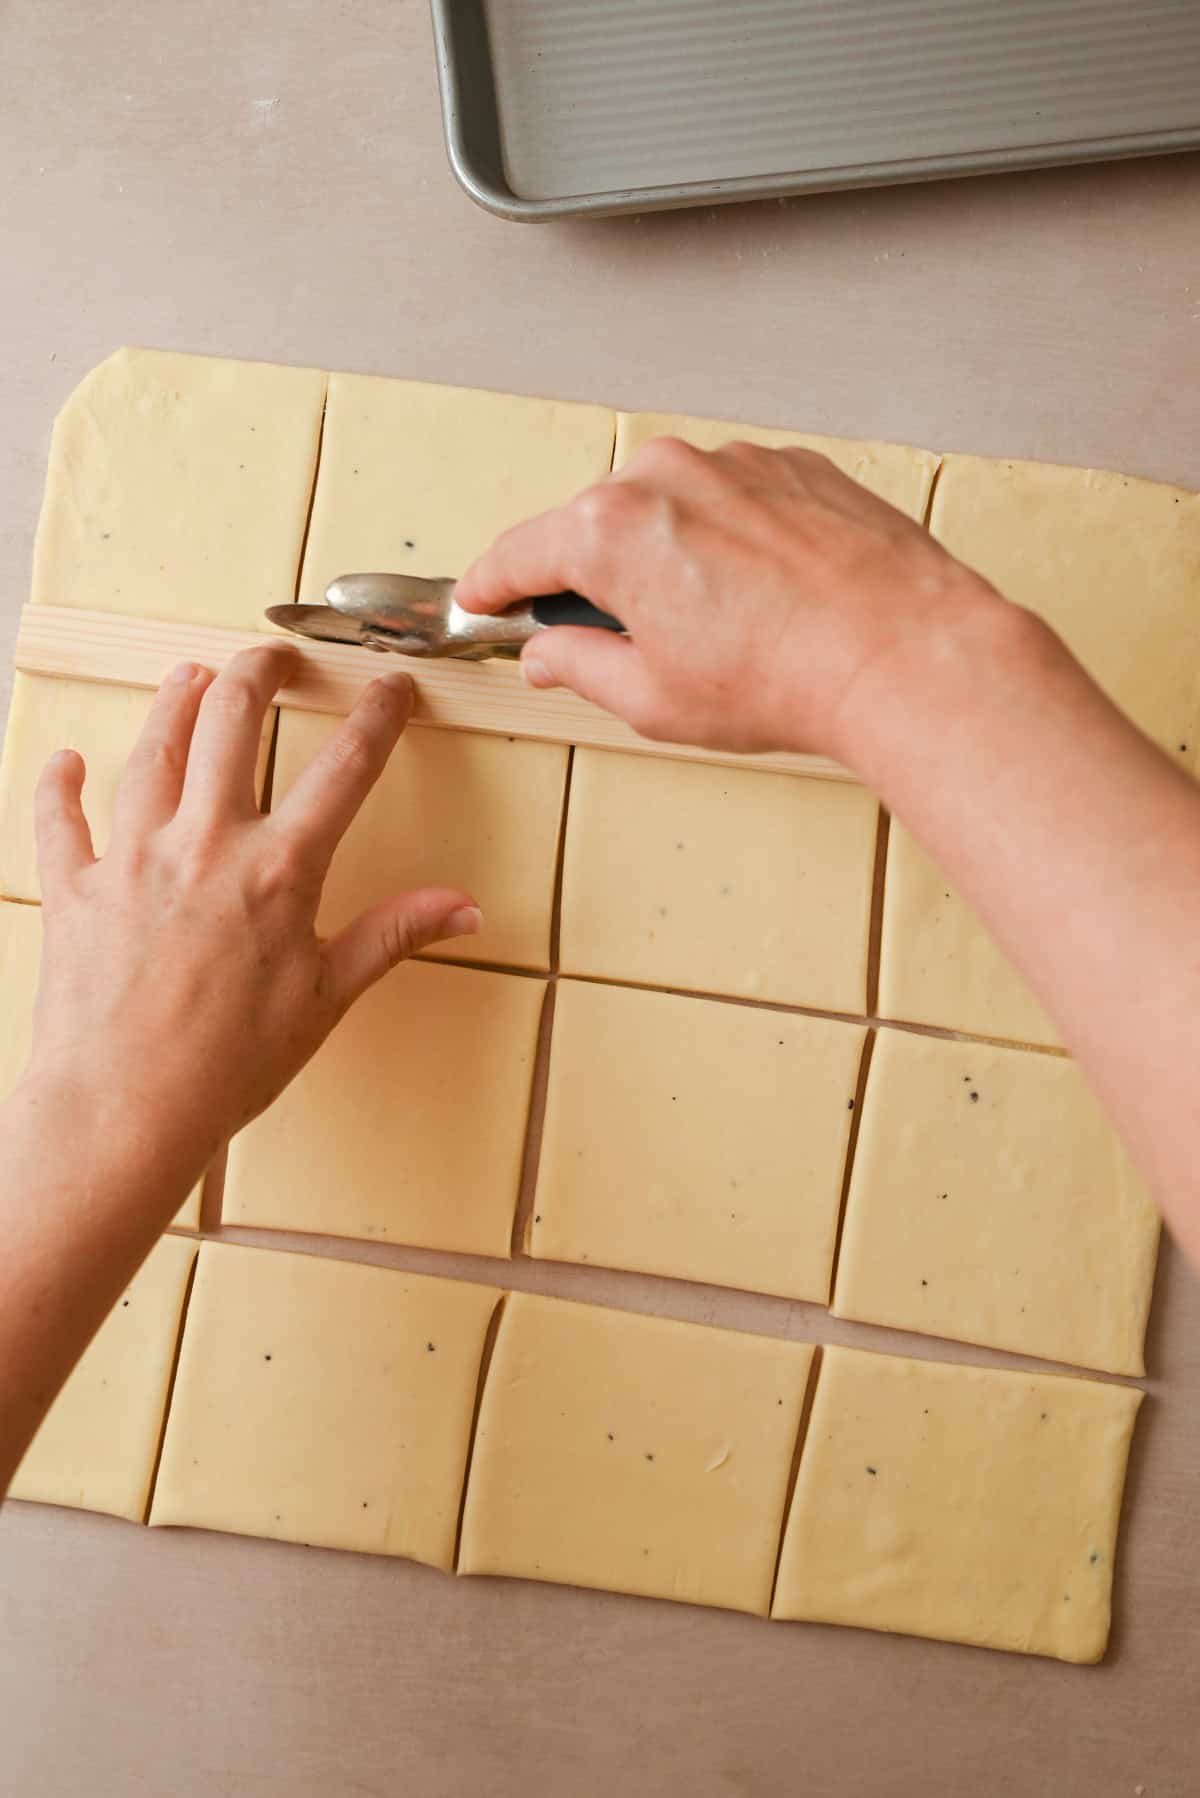
- Roll the chilled dough to around 5mm thick until you have a 40x40cm (16×16 inch) square. Cut into 16 equal squares, each about 10x10cm (4×4 inches).
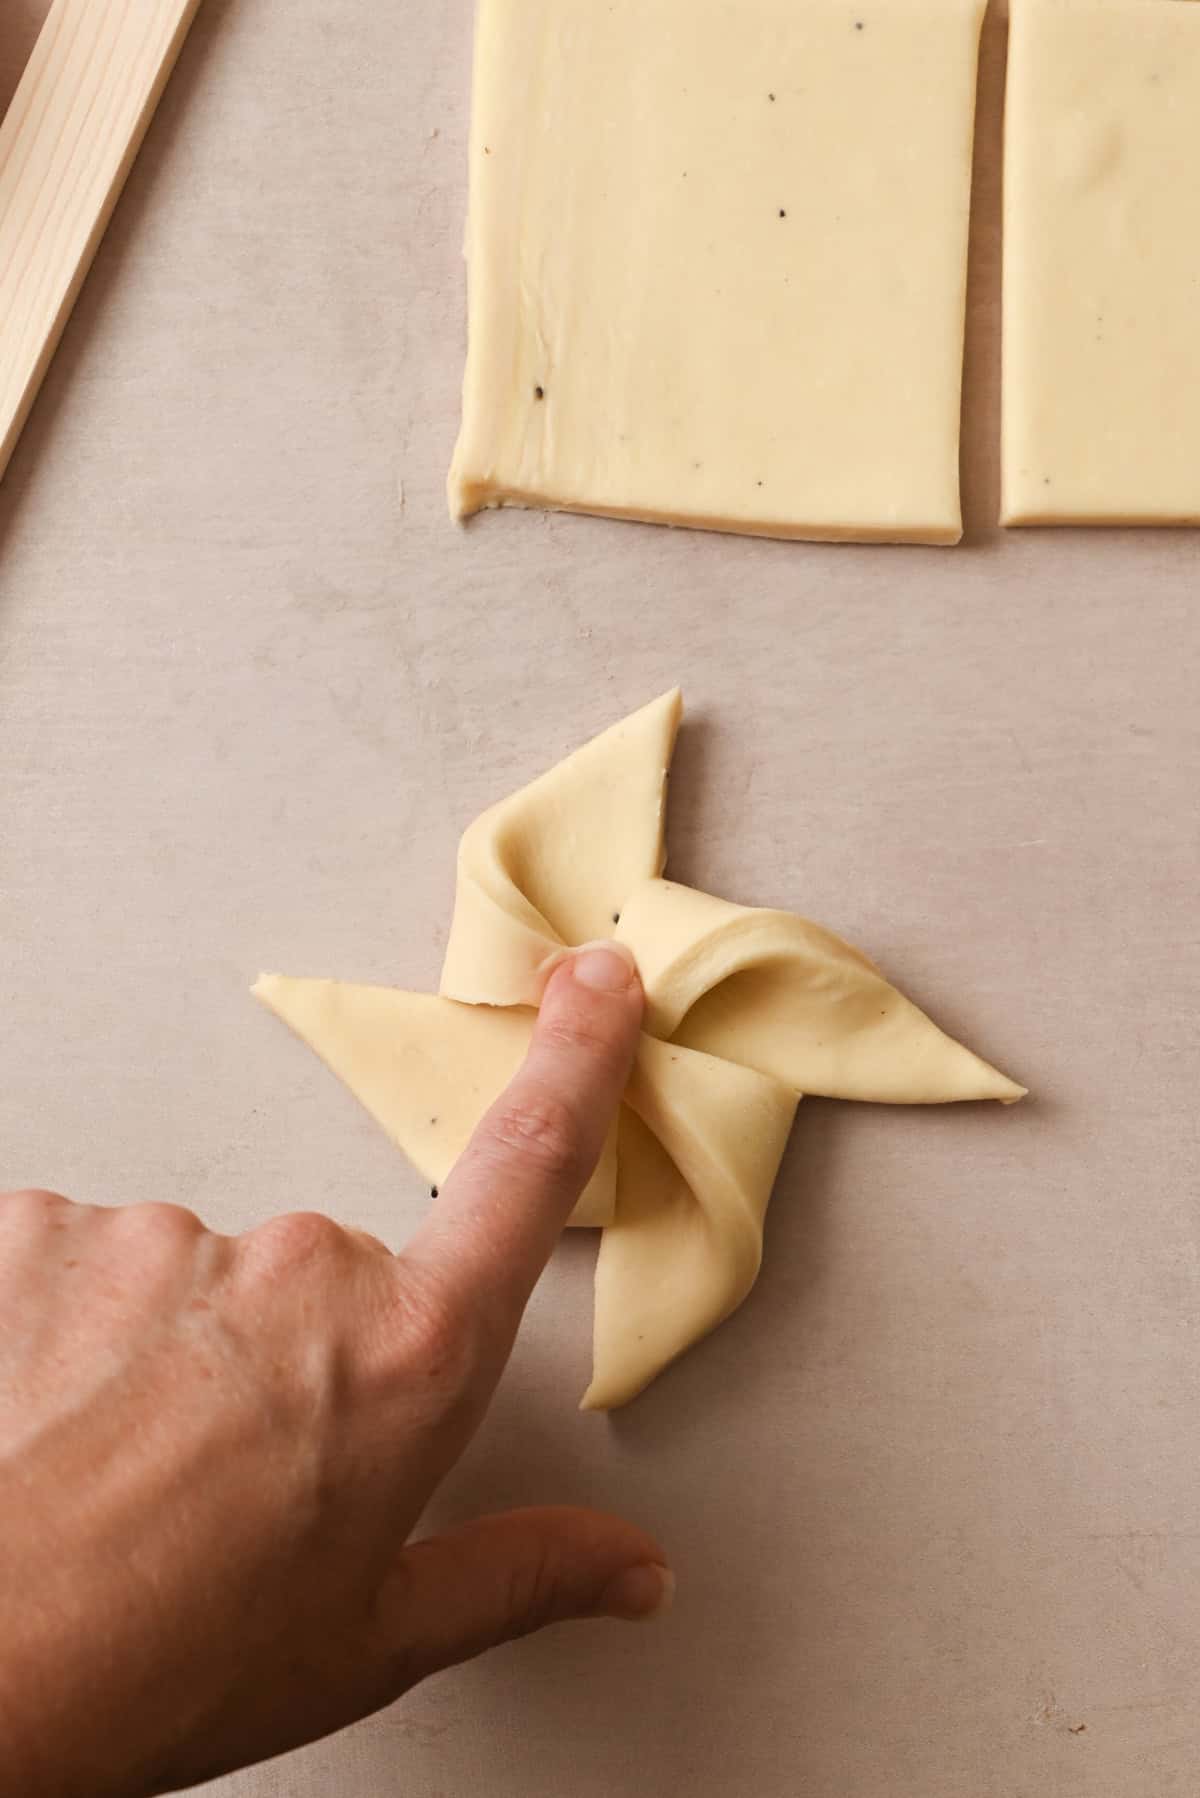
- Windmills: Make a diagonal slit from each corner of the square towards the centre, stopping about 1cm from the middle. Take one side of each of the cut pieces and fold it into the centre, all folding in the same direction. Press the centre gently to help it stick.
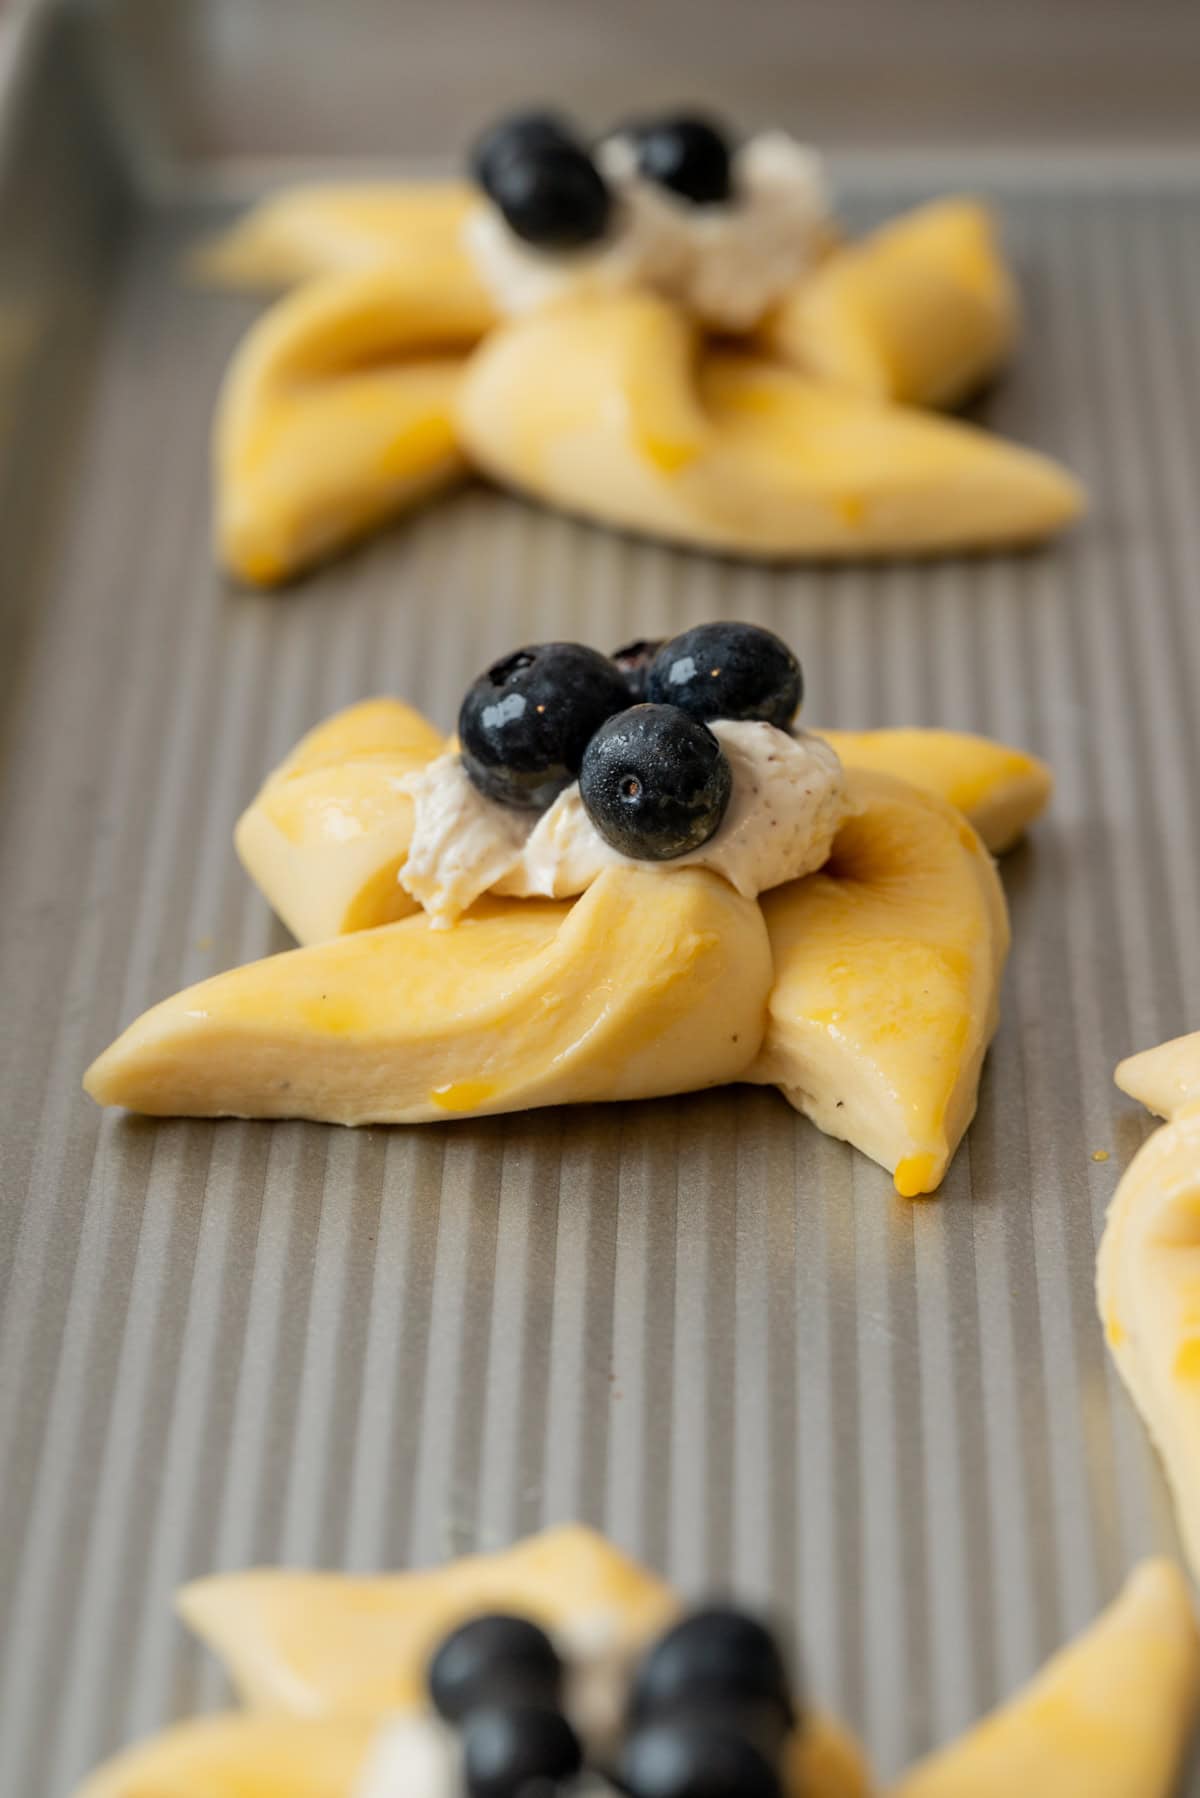
- Leave the shaped pastries at room temperature to proof til puffy. Add a teaspoon of filling to the centre of each pastry then brush the exposed pastry edges with egg wash.

- Bake until deep golden brown. Drizzle with glaze once cooled.
Other shapes to try
- Envelope fold (spandauer): Make a diagonal slit from each corner towards the centre without the cuts meeting, then fold all four corners into the middle and press down firmly. They need to be filled before folding, since the filling acts as glue to hold the corners in place during proofing. Because the filling will be sitting at room temperature for the full 4-5 hour proof, make sure to use something that is fine to leave out, like jam or remonce (a mixture of butter, sugar, and marzipan).
- Pinwheel: The same cuts as the windmill but fold alternate points into the centre rather than all in the same direction. This gives a slightly different look with more of an open star shape.
- Simple square: No folding at all. Press a well into the centre of each square with your thumb and fill it. Quick, easy, and great for custard fillings.
Tips
- Keep everything cold. The number one rule with laminated dough is that the butter must stay in distinct layers and not melt into the dough. If at any point during folding the dough feels warm, sticky, or you can see the butter starting to soften through the surface, put it straight back in the fridge for 20-30 minutes before continuing.
- Check your butter consistency before encasing it. You want the butter to be about the same consistency as the dough which is cold, but bends without shattering. If you press it and it cracks or splinters, it’s too cold and will break through the dough layers when you roll it. Leave it at room temperature for 5 minutes and try again. If it’s squishy and soft, it’s too warm. Pop it back in the fridge.
- Keep checking for sticking as you roll. Every few passes of the rolling pin, lift the dough and check it’s not sticking to the bench. If it is, slide a dough scraper or your hand underneath to release it and dust the bench with a little flour before continuing. Dough that sticks and then tears ruins the layers, so it’s worth checking regularly rather than discovering it too late.
- Proofing environment. If your kitchen is cool, you can create a warm proofing spot by placing the pastries in a turned-off oven with a cup of just-boiled water. Just make sure the cup of water is to the side rather than directly underneath the pastries, as the heat rising from it can melt the butter layers. If they’re drying out on the surface, drape a lightly damp piece of cloth over them or brush gently with a little water.

Storing and freezing
Store cooled pastries in an airtight container at room temperature for up to 2 days. Warm them in a 160°C/320°F oven for 5-8 minutes to refresh the pastry.
Freezing baked pastries: Once completely cooled, freeze the pastries in an airtight bag or container for up to 2 months. Reheat directly from frozen in a 170°C/340°F oven for 10-15 minutes. No need to thaw first.
Freezing unbaked pastries: You can also freeze the pastries after shaping, before the final proof. Freeze them flat on a tray first, then transfer to a bag. When you want to bake them, place them on a lined tray straight from the freezer and allow them to proof at room temperature; this will take longer than usual (6-8 hours) since they need to thaw and proof.
Related Recipes
If you loved making these, you might also enjoy my flaky sourdough croissants, which use a very similar laminated dough, or crackly Sourdough Kouign Amann with their caramlised exterior. For a chocolate version, my sourdough pain au chocolat uses the croissant dough with a dark chocolate filling.

Sourdough Danish Pastries
Ingredients
Starter
- 20 g starter
- 60 g flour
- 60 g water
Dough
- All the starter around 120g
- 100 g milk
- 80 g water
- 450 g all-purpose flour
- 50 g granulated sugar
- 1 large egg
- 1 tsp salt
- 1/4 tsp ground cardamom freshly ground, optional
- 50 g unsalted butter softened to room temperature
Butter packet
- 250 g unsalted butter
Cream cheese filling
- 113 g cream cheese room temperature
- 1 Tablespoon lemon juice
- 1/2 Tablespoon lemon zest
- 2 Tablespoons powdered sugar plus more for dusting
- blueberries fresh or frozen
Egg wash
- 1 large egg
- 1 Tablespoon water
Glaze
- 80 g powdered sugar
- 1-2 Tbsp water added gradually until you reach a pourable consistency
Instructions
The evening before
- Mix the starter, flour, and water in a small bowl or jar until combined. Leave at room temperature overnight until doubled and bubbly. If your kitchen is warm, use a 1:5:5 ratio so it rises more slowly and doesn't peak too early. 20 g starter, 60 g water, 60 g flour
Day 1
- Whisk the active starter into the milk and water in a large bowl until loosened. All the starter, 100 g milk, 80 g water
- Add the flour, sugar, egg, salt, and cardamom (if using) and mix until a dough forms, about 3-4 minutes. 450 g all-purpose flour, 50 g granulated sugar, 1 large egg, 1 tsp salt. 1/4 tsp ground cardamom
- Tip it onto the bench, add the softened butter, and knead until fully incorporated and the dough is smooth. Shape it into a ball and place it in a clean, lightly greased bowl. Cover and leave to ferment in a warm spot (ideally 23-25°C/74-77°F) for approximately 3 hours, until risen by about 30-40%. It should look noticeably puffier but does not need to double. 50 g unsalted butter
- Once the bulk ferment is done, gently press the dough into a flat rectangle. Wrap it tightly in parchment paper or plastic wrap and refrigerate for at least 2 hours.
Make the butter packet
- Slice the cold butter and arrange the pieces in a grid on a sheet of parchment paper so they sit snugly together. Place a second sheet on top and use a rolling pin to bash and roll the butter into an even, flat block. Fold the parchment edges in to create a neat 15x20cm (6×8 inch) frame and press the butter to fill it evenly. Refrigerate until cold. If using the flour method, soften the butter first, mix in 1½ tablespoons of flour, then roll between the parchment sheets into the same size rectangle. 250 g unsalted butter
Encase the butter
- Remove the butter from the fridge and give it a few firm bashes with the rolling pin to make it pliable again before you start. It should feel cold but nice and bendable, like a firm clay. Roll the chilled dough out on a lightly floured bench into a 20x30cm (8×12 inch) rectangle. Place the butter in the centre of the dough. Fold the top third of the dough down over the butter, and the bottom third up to meet it. Pinch the edges firmly to seal. Use a sharp knife to make a very shallow slit along each long edge of the dough, just scoring the surface, not cutting through. This relieves tension and helps the dough roll out evenly. Turn the dough 90 degrees.
- Using a rolling pin, gently press across the dough to start dispersing the butter. Once the butter starts to move with the dough, begin rolling properly. Roll it out to around 8mm thick, focusing on length and thickness rather than width. Always roll away from you in one direction, then lift the pin back to roll again rather than rolling back and forth. Rolling back and forth drags the layers in opposite directions and smears the butter rather than keeping it in clean sheets.Check the dough isn't sticking to the bench and dust lightly with flour if needed. Trim the uneven short ends with a sharp knife to expose the layers, then brush off any excess flour from the surface. Fold the bottom third up and the top third down over it (a letter fold). Wrap in parchment or plastic wrap and refrigerate for 30 minutes.
- Take the dough from the fridge and rotate 90 degrees from how it was last folded. Roll out to 8mm thick, focusing on length and thickness, trim, brush, and letter-fold again. Wrap and refrigerate for 30 minutes. Repeat one final time for three letter folds total. Note: if the butter shatters when you start rolling, it's too cold. Leave the dough on the bench for 5-10 minutes before continuing. If the butter feels soft or greasy, refrigerate it immediately.
- After the third fold, wrap the dough tightly and refrigerate for at least 8 hours, or overnight.
Day 2
- Remove the dough from the fridge. On a lightly floured bench, roll it out to a 40x40cm (16×16 inch) square that's around 4mm thick. Use a pizza cutter or sharp knife to cut it into 16 equal squares, each approximately 10x10cm (4×4 inches).
- Windmill shape: Make a diagonal slit from each corner of the square towards the centre, stopping around 1cm from the middle so the slits don't meet. Take one side of each of the four cut pieces and fold it into the centre, all folding in the same direction like a pinwheel. Press the centre gently to help it stick together. See the shapes section in the post for other options including the envelope fold and simple square.
- Place the shaped pastries on baking-paper-lined trays, spaced well apart. Leave them to proof at room temperature (23-25°C/74-77°F) for 4-5 hours. They should look puffier and feel light. If they're drying out, drape a lightly damp cloth over them or brush gently with water. If your kitchen is cool, place them in a turned-off oven with a cup of hot water to create a little warmth. Just make sure the cup of water is to the side rather than directly underneath the pastries, as the heat rising from it can melt the butter layers.
- Preheat the oven to 190°C/375°F. Mix together all the cream cheese filling ingredients (except the berries). Add a teaspoon of filling or pastry cream to the centre of each Danish, then top with berries or peach slices. 113 g cream cheese, 1 Tablespoon lemon juice, 1/2 Tablespoon lemon zest, 2 Tablespoons powdered sugar, blueberries
- Mix the egg and water, then brush the exposed pastry edges with egg wash. 1 large egg, 1 Tablespoon water
- Bake in two batches for 18-22 minutes until deeply golden brown. Keep an eye on the windmill points in the last few minutes; they can get a little dark. Cool on the tray for 30 minutes.
- Dust with icing sugar or drizzle with an icing glaze. Serve warm.
Notes
- Bulk ferment visual cue: You’re looking for a 30-40% increase in volume, not a full double. The dough should look noticeably puffier. In a cooler kitchen this may take up to 5 hours.
- Final proof: Don’t skip or rush this step. Underproofed pastries will seem gummy and dense inside even if they look baked.
- Temperature: If your kitchen is warmer than 25°C/77°F, work quickly and refrigerate the dough extra during folds if you feel it warming up.
- Freezing: Baked pastries freeze well for up to 2 months. Reheat directly from frozen at 170°C/340°F for 10-15 minutes. You can also freeze shaped (but unproofed) pastries and thaw/proof them at room temperature before baking; allow 6-8 hours.


These were great
I made these for the 1st time today, I’d been practicing making your croissants.
These came out fantastic.. I need to practice some more ( oh no more pastry), cause my rolling sucks but.. 10/10.. Will make again.
Hi thank you so much for this recipe, I can’t wait to try it. I was wondering how you get the butter and dough so perfectly square?
Hey I fold two sheets of parchment paper into a square and encase the butter with that, so then when I roll it out it goes right to the borders and fits the square
Hi it says to proof for 3 hours, what percent rise or dough temp should we be looking for as I know that all house differ in temperature
Around a 30-40% rise, so the dough looks visibly puffier 🙂
Just made these danishes this weekend with my sourdough starter! Instead of blueberries I used fresh strawberries we picked this weekend. I also added a little lemon juice to the glaze for topping! I’ve never made any kind of pastry dough but they came out wonderfully
Hi! Just found this recipe and I’m excited to try – I have a fed starter at its peak and wanted to throw it in however I’m not sure how many grams since I didn’t feed at the written proportions? What would you say is an approximate anount of fed starter in this recipe? Thanks!
Heya, it’s around 120g starter 🙂
These are almost ready to bake. I wish there were more photos of the folding process. I feel like mine is far too thick compared to how thin the dough is when cutting into squares. Is it really just 3 folds when you’re done?
Hey, sorry you’re having trouble. I will update with newer photos at some point. It’s 3 folds, but then after the folds you’ll roll the dough out again to cut them into the squares 🙂
That’s when it becomes thinner
Thank you so much for such a quick reply! My husband and I had these for breakfast this morning, and they were an absolute smash!! I had a question for the next time I bake them- what is the dough supposed to look like when the first proofing stage is complete? Doubled in size, airy, etc? My kitchen is on the colder side, so I let the dough proof for 5ish hours instead of 3. Everything turned out excellent. Thanks again!!
Just slightly fuller, about 50% bulked. Sounds like you did it perfectly! So you happy you loved them 🙂
Hey there! I’m wondering how many grams of starter you use when you say “all of the starter”. I make a fairly large starter, so I was looking to just simply pull from that instead of making a seperate one. Thanks!
Heya use a round 120g starter 🙂