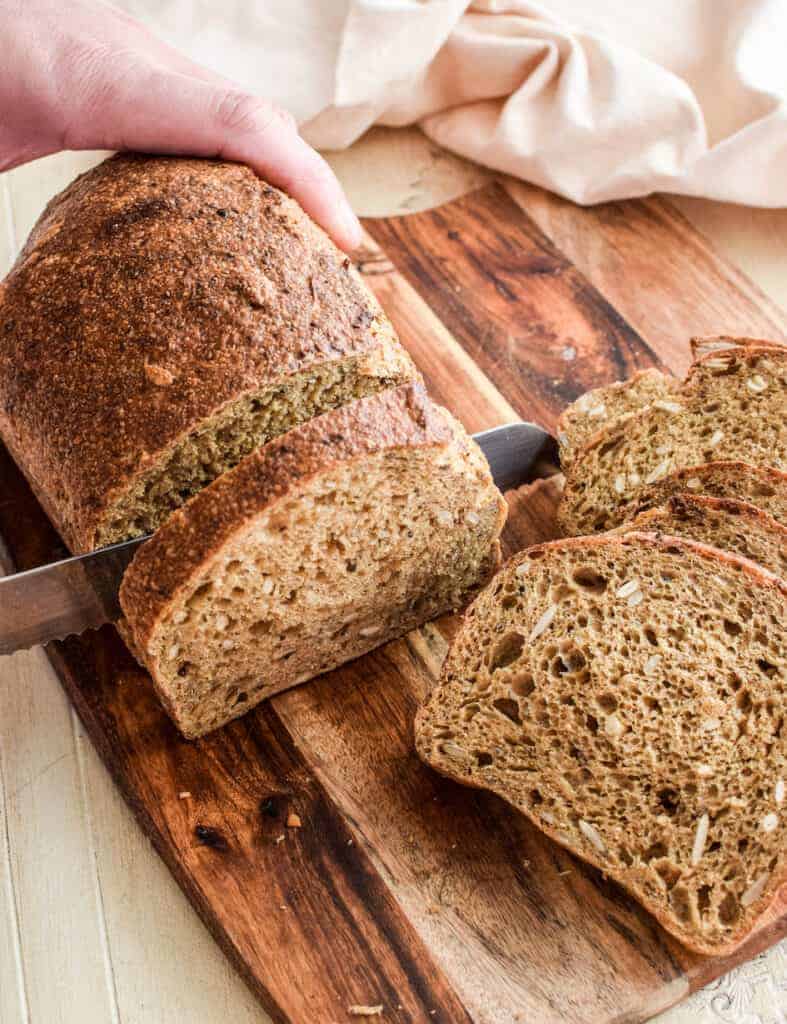
Healthy Sourdough Sandwich Bread Recipe
A soft and delicious sourdough sandwich bread recipe, made with wholewheat flour and seeds. It makes perfect sandwich bread or delicious sourdough toast!
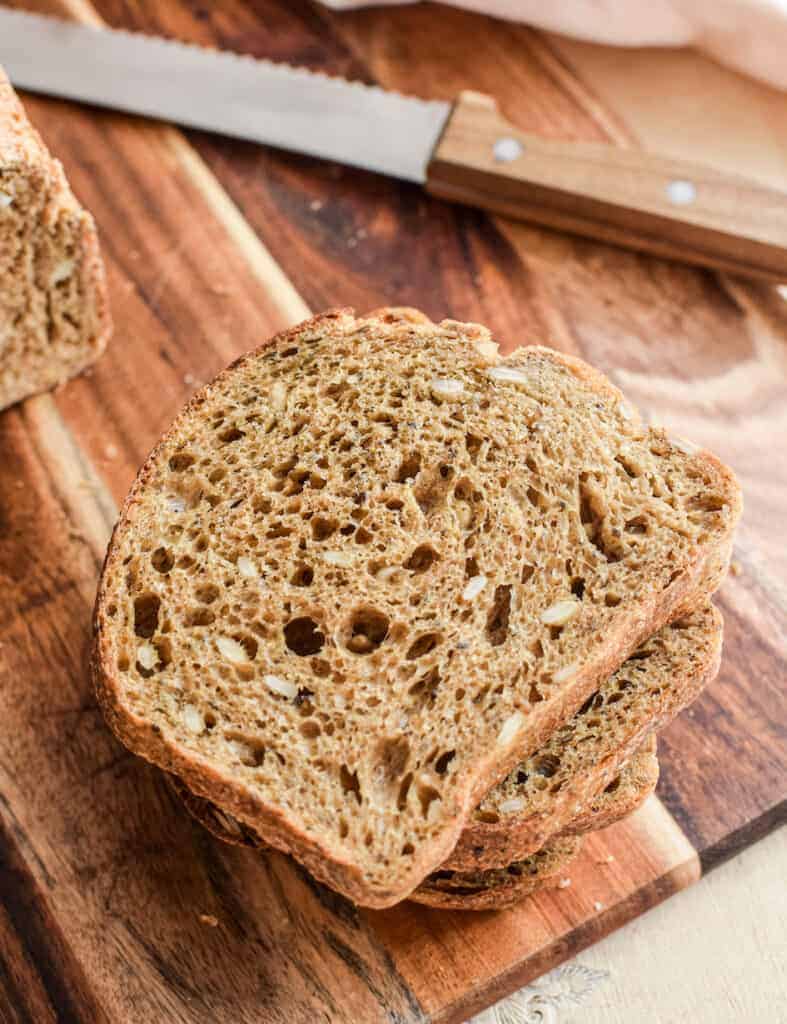
This sourdough sandwich bread has great texture thanks to the seeds, a real depth of flavour thanks to the molasses and it stays moist even after days in the bread bin.
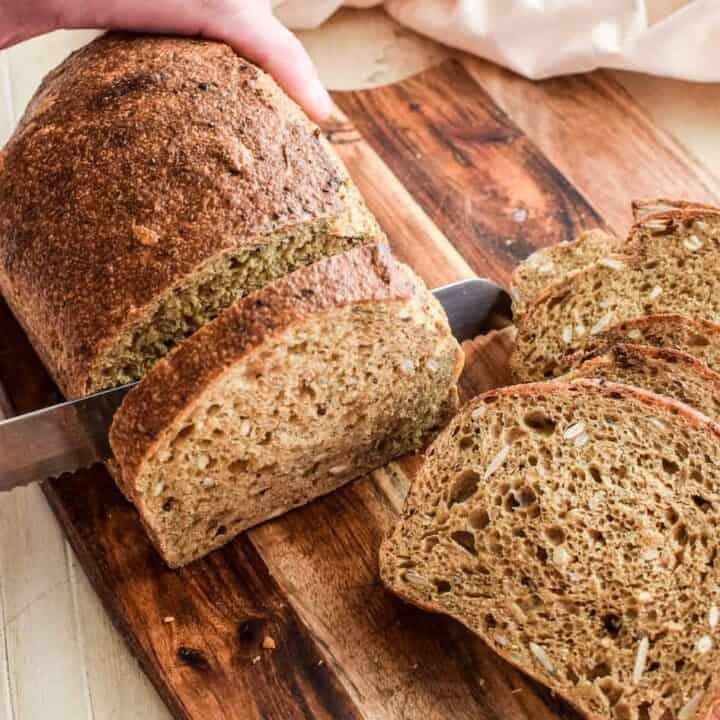
It’s baked in a loaf tin which makes it easy to slice into even-sized slices. I like to make a few extra loaves, slice ’em up and keep them in the freezer.
Sourdough Sandwich Bread Ingredients
This bread has a mix of both white flour and wholemeal. For the white flour portion, I use strong bread flour with a protein level of at least 11%. For the wholemeal part, I really like using a finely milled wholemeal flour
The dough also has chia seeds, sunflower seeds, and ground linseeds, plus a tablespoon of blackstrap molasses. The molasses could be subbed with honey or maple syrup if you don’t have it, but it’s actually not there to give the bread sweetness.
Molasses helps keep the bread moist and adds flavour and beautiful natural caramel colour.
In general, using a sourdough starter in your bread really helps to keep it moist. If you’ve ever made homemade bread with commercial yeast and wondered ‘why is my homemade bread so dry?’, I think you’ll be pleasantly surprised at what a difference a sourdough starter makes in bread.
Dough Hydration
This sourdough sandwich bread dough has a high hydration level, meaning it’s very wet and sticky. The wholemeal flour and the chia and flax seeds absorb some of that moisture, but the dough will still be wet.
Don’t worry though, a wet dough (coupled with an excellent starter) makes beautiful bread.
Just wet your hands well each time you touch the dough so it doesn’t stick to your fingers.

The Sourdough Starter
Before we start with the process, as with all sourdough a good starter is key.
For my recipes that means one starter that is very active with low acid content. Each time I feed my starter, it’s with a small amount of original seed starter and plenty of fresh flour and water. This keeps the acid content nice and low in the starter. Too much acid makes a very hard to work with dough.
My starter at its peak is light and airy. If you’re familiar with sourdough starters I’m sure you’ll know what I mean.
Sourdough Sandwich Bread Timing
I’m going to run through my timings with this sourdough sandwich bread and how I fit it in my days.
You don’t need to follow this exact schedule, you can change it to fit around your own timetable.
The Night Before: Feed Starter
The night before I want to bake, I feed my starter. Because it’s being fed so far in advance, I feed my starter 3 times the amount of fresh flour as I do seed starter. This is so it slows it down so it doesn’t peak overnight before I’m ready to use it.
So, overnight I’d feed my starter 1:3:3 (that’s 1 part starter, 3 parts flour, 3 parts water). Fresh flour is the food source for yeasts and bacteria. Always remember that the more flour that is added, the more they have to get through and the slower the rise.
If I am feeding my starter on the day as opposed to the night before, I would feed it 1:2:2, for a quicker rise.
Starter feeding
The dough needs 120g of active starter, so you could take 20 grams starter, 60 grams flour, and 60 grams water ( a ratio of 1:3:3).
Mix this together well and you’ll have a total of 140 grams of starter ready for the morning of which you can measure out 120g.
The Following Morning (8:30 am) – The Autolyse
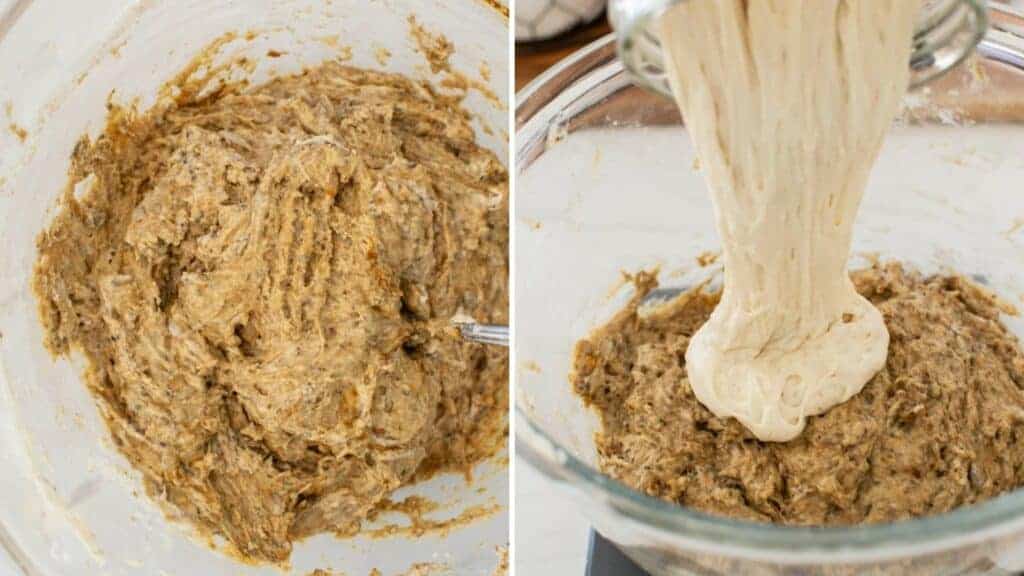
Combine all the dough ingredients except for the starter in a bowl and mix it into a sticky dough. Leave the dough to sit for around 30 minutes to hydrate. Cover the bowl with a plate to stop it from drying out.
This step is called the autolyze.
After the dough has hydrated, add in the risen starter. This is a sticky job. Wet your hands to stop the dough from sticking to you and squish it together until it has combined.
Once it is combined, drop the dough into a low dish, like a glass pie dish.
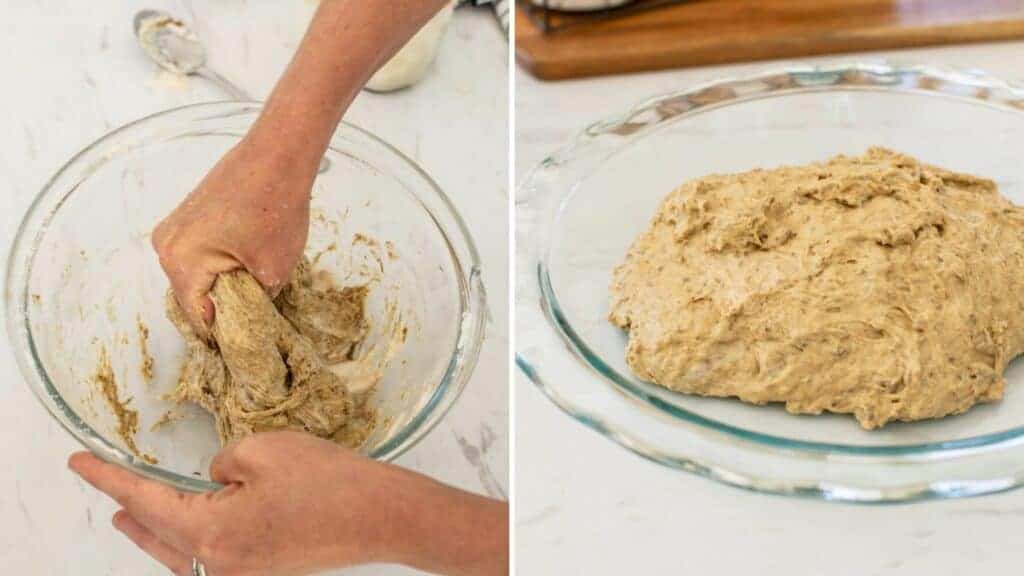
9am – 11:30am: Folding
I let this dough rest for around 30 minutes, then perform 4 x sets of coil folds, one every 30 minutes. In between each fold, cover the dish with a plate to stop the dough from drying out.
See the video on how to perform a coil fold as shown on my rustic honey oat sourdough bread
Over time this gently strengthens the gluten in the dough.
You can see how the dough changes in structure in these next three pictures.
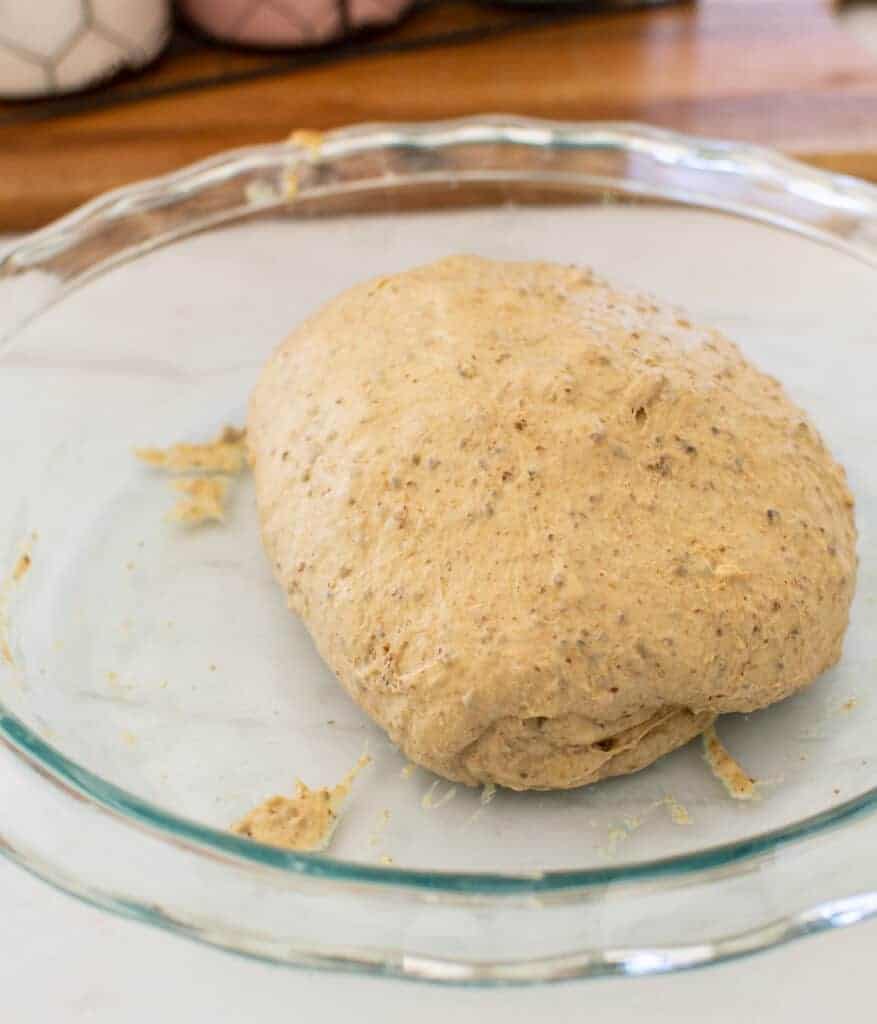
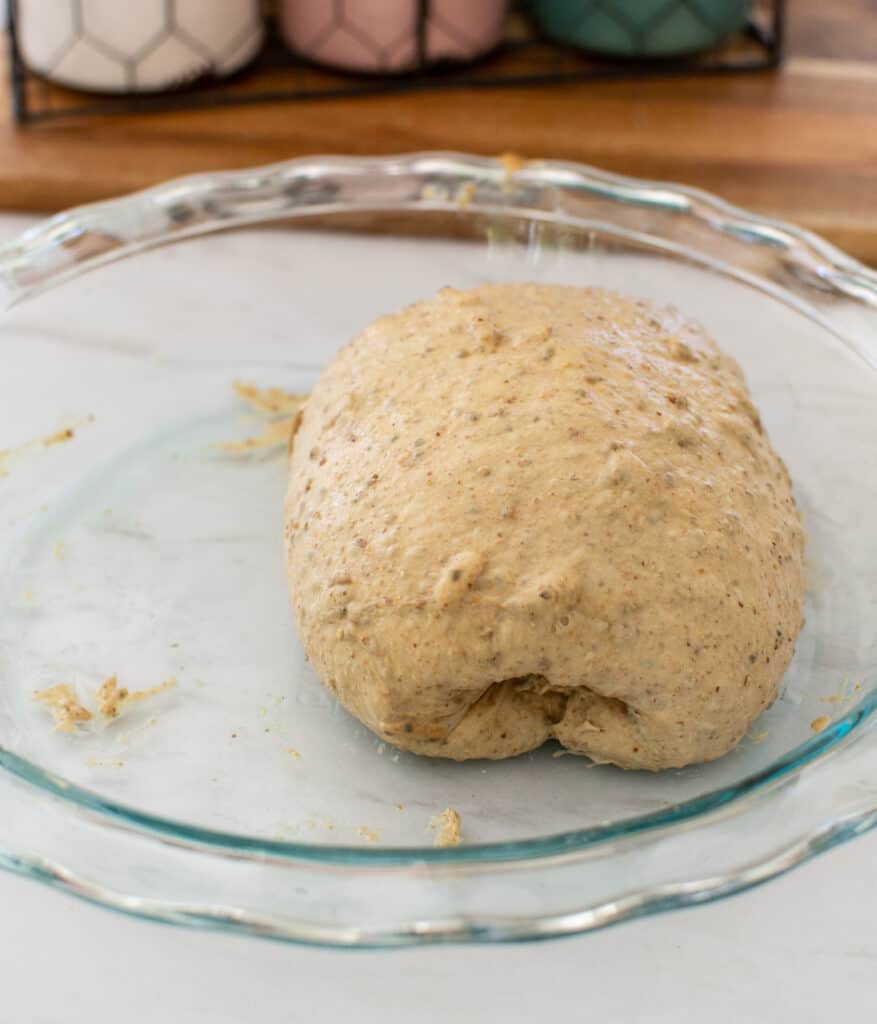
The dough is technically still very sticky. If you squished a dry hand into it, it would get stuck to your skin. However, wetting your hands thoroughly when folding and doing quick and smooth motions will help the dough slide off.
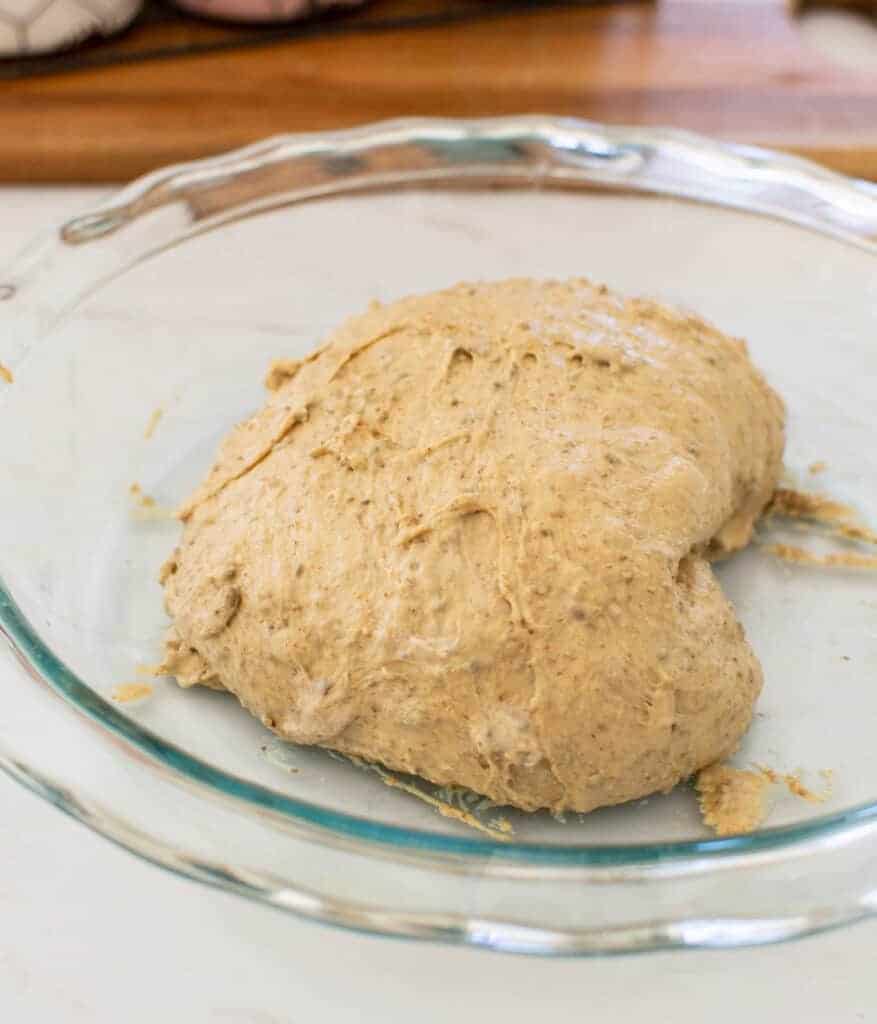
After 4 folds are completed, leave the dough to rest for another 30 minutes, then it’s time to shape the dough. Unlike my regular usual sourdough bread loaf, the bulk ferment for this bread happens while it is already shaped and in the loaf tin.
12pm – Shaping
On a floured bench, tip out the dough and gently stretch it out into a square.
Flour your hands, then take one edge of the square and bring it into the middle, then repeat with the remaining edges and form a ball.
With the seams facing up, push the ball out onto the bench, and roll it up like you would a sleeping bag or a Swiss roll.
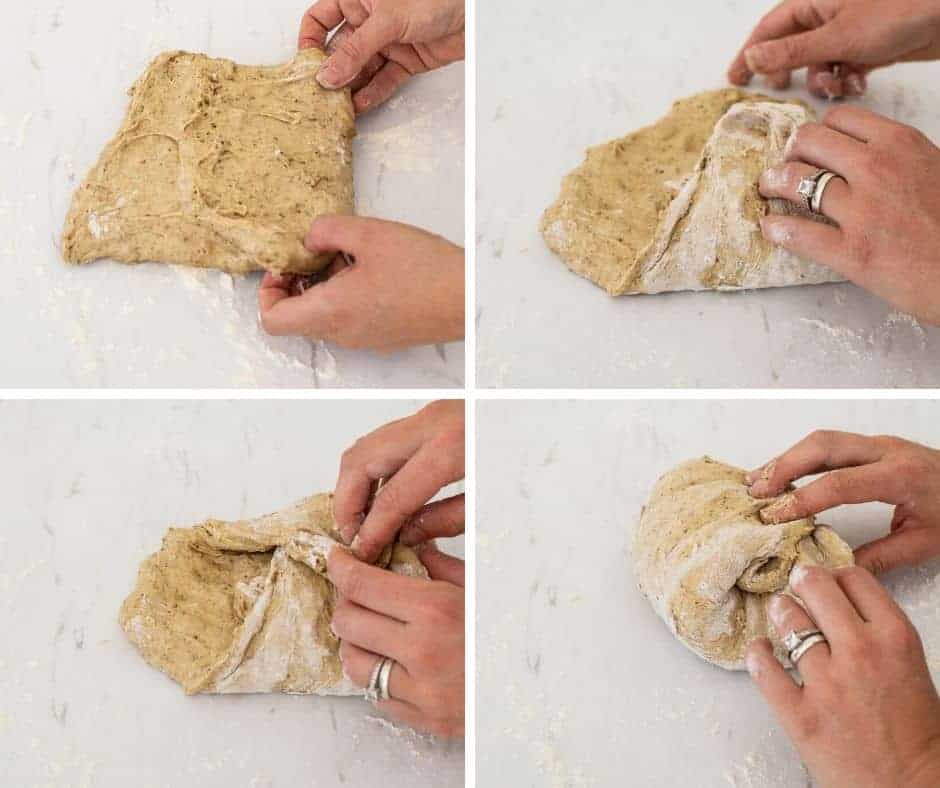

Place the dough, seam side down into a paper-lined loaf tin. I use 8x4inch/21x11cm loaf tin.
I really recommend lining it as every time I have tried it without baking paper, my bread has stuck. A home-compostable baking paper can be reused multiple times, and composted when done.
12pm onwards
Now leave it to rise in a warm place until has bulked out by about 50%. It doesn’t need to double, only fill out by half the amount.
A warm room temperature will help the dough to rise. If necessary, create a warm spot such as an oven that has been lightly preheated and then turned off. In a warm spot like this, it should take approximately 3 hours, but it may take longer in cooler temperatures. It’s best to watch the dough and not the clock.
The risen dough should look and feel airier if gently prodded with a wet finger.
During this rise, cover the loaf tin with a dampened tea towel to stop the dough from drying out.

3 pm – Cold Proof
Now the dough is put in the fridge for cold-proof, where the fermentation is slowed down and the flavour is developed. This can be for a minimum of 4 hours or all the way up to 20 hours. During the cold-proof, cover the loaf tin with a dampened tea towel to stop the dough from drying out.
The longer the cold-proof, the sourer the sourdough will taste.
I like to bake the bread that evening, so it has cooled by morning and can be sliced for school sandwiches, so I leave it for a cold-proof of around 5 hours.
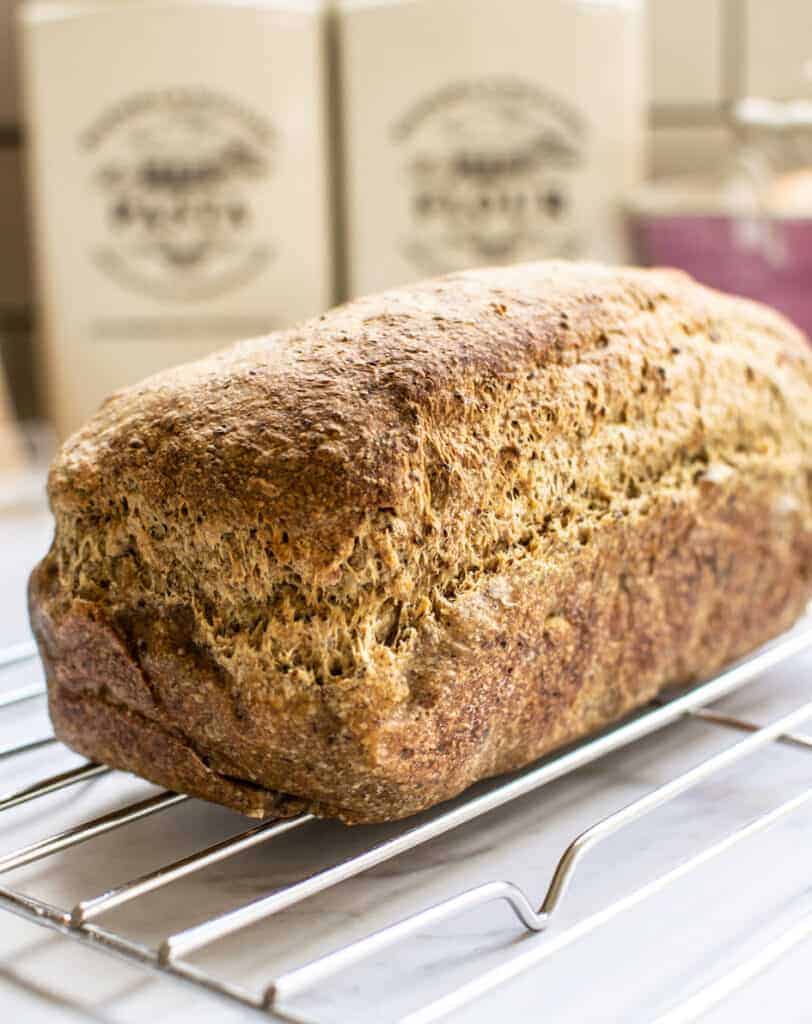
8 pm – Baking Time
Preheat the oven to 220°C/425°F.
The bread is baked for around 30-35 minutes. You will know it is done if you lift the dough out of the tin and tap the bottom of the bread. It will give a hollow sound when done.
Now it needs to cool right down, for a minimum of 2 hours before slicing it.
Want more sourdough breads? Try these!
Sourdough Grain Sandwich Bread
A soft sourdough whole-grain sandwich bread full of grains and seeds. A touch of pure molasses adds flavour and helps to keep it moist
Ingredients
- 120g active fed starter*, See notes below
- 270g bread flour**
- 80g finely milled wholemeal flour
- 7g salt
- 4 Tbsp sunflower seeds
- 2 Tbsp ground linseeds (flaxseeds)
- 1 Tbsp chia seeds
- 1 Tbsp blackstrap molasses
- 280g water
Instructions
The Night Before
- Feed your starter at a ratio of 1:3:3 to ensure you'll have 120g ready to use in the morning.
For example, 25g of seed starter, 50grams of fresh flour, and 50g of water, of which should give you enough for the bread an a little leftover for feeding for next time. Ensure your starter has at least doubled, if not tripled (but not collapsed), before using it.
The Next Morning - Mixing The Dough
- Your starter should have easily doubled, if not tripled at this point, and should still be holding its shape. If it has risen and then sunk (you should see the marks on the jar), it may have risen too quickly overnight and passed its peak. In the future, your starter can be fed more flour, and less seed starter to slow this rise down.
- Combine the water and the molasses and whisk with a fork until they are combined.
- In a large bowl combine all the bread ingredients (except for the starter) and mix into a shaggy dough. Cover the bowl with a plate and leave the dough on the bench to hydrate, for 15-30 minutes.
- Add the starter to the autolyzed dough and mix it well together, then place it into a shallow glass dish. Every 30 minutes, perform 1 set of coil folds (see the video in the post above.) Do this a total of 4 times. In between the folds, keep the dish covered with a plate or damp kitchen towel to stop the dough from drying out.
- After the 4th fold, leave the dough to sit and rest for a further 30 minutes.
Shaping The Dough
- Now, flour your hands and a workbench and tip out the dough. Gently stretch it out into a square. Take one edge of the square and bring it into the middle, then repeat with the remaining edges and form a ball. With the seams facing up, push the ball out onto the bench, and roll it up like you would a sleeping bag or a Swiss roll.
- Place the dough, seam side down into a parchment paper-lined 8x4inch/21x11cm loaf tin.
- Now leave it to rise in a warm place (ideally around 25°C/77°F) until has bulked out by 50%. If necessary, create a warm spot such as an oven that has been gently preheated (and then turned off.) In a warm spot, it should take approximately 3-4 hours, but it may take longer in cooler temperatures. It's best to watch the dough and not the clock. During this rise, cover the loaf tin to stop the dough from drying out.
Cold Proof
- Now the dough is put in the fridge for a cold-proof, where the fermentation is slowed down and the flavor is developed.
- This should be a minimum of 4 hours but it can go up to 24 hours if you want to bake your bread the following day. I like to bake it that night, so it has cooled by morning and can be sliced for school sandwiches.
- During the cold-proof, cover the loaf tin with a dampened tea towel or compostable plastic wrap to stop the dough from drying out.
Baking
- After the cold-proof, it's time to bake. Heat the oven 220°C/425°F. Once the oven is heated, bake the bread for around 30-35 minutes. If you lift the bread out of the tin and tap the bottom it should sound hollow when it's done.
- Leave the bread to cool for a minimum of 2 hours before slicing.
Notes
*^this recipe has been slightly changed recently to make the loaf a bit bigger. Here are the original amounts.
- 120g active fed starter
- 220g bread flour
- 80g finely milled wholemeal flour
- 6g salt
- 3 tablespoon sunflower seeds
- 2 tablespoon ground linseeds (flaxseeds)
- 1 tablespoon chia seeds
- 1 tablespoon blackstrap molasses
- 260 grams water
Nutrition Information:
Yield: 8 Serving Size: 1Amount Per Serving: Calories: 192Total Fat: 3gSaturated Fat: 0gTrans Fat: 0gUnsaturated Fat: 3gCholesterol: 0mgSodium: 631mgCarbohydrates: 35gFiber: 3gSugar: 2gProtein: 6g


Lovely recipe and change from the crusty boule I usually make. My loaf pan is bigger than yours, so it didn’t fill out the pan as much. Have you tried doubling the recipe?
Heya, yup this can be doubled 🙂
I only bake once a week so keep my starter in the fridge. Can I start this recipe with starter straight from the fridge or do I need to add an extra feed to wake it up?
Hey, if you feed your starter prior to putting it in the fridge it would be fine to use it, however an extra feed is never a bad thing so if you can give it that extra feed I would and you’ll likely have even better results 🙂
My first attempt at a SD loaf and I love this recipe. It’s soft, springy, aromatic and got bite thanks to the seeds. I added sesame instead of chia and was too lazy to grind the linseeds. Will be making again. Thank you !
Another great Sourdough recipe, easy to make and tastes great I make this once to twice a week, makes the best sandwiches and toast. I add pumpkin seeds also.
Thank you Jo! So happy you love this recipe!
I love this recipe. Have been making it every couple of weeks for months. I prefer spelt flour to wholemeal and am a bit loose with the flour ratio – sometimes up to 100/200 – as long as it adds up to 300 total seems to work fine 🙂 I prefer a very scant tablespoon of the molasses also. Comes out great every time.
Really appreciated the little videos to get the hang of the coil folding and shaping.
Last loaf I tried something new and pressed unhulled seaseme seeds onto the loaf after shaping and it came out great – I love a seaseme crust, might not be to everyones taste.
Thanks for all the work you put into this site. And good luck with the book launch 🙂
Spelt flour is a great addition! So pleased you’re enjoying the recipe and thank you so much for your lovely comment!
Beautiful recipe. Love the texture from the seeds & can’t wait to make school lunches tomorrow.
Slightly sweet from the addition of molasses which I’m not used to. I may cut it back a tad next time.
Lovely crunch on the crust.
This has become our standard bread recipe (and I also now double it to make two loaves). The bread is delicious and moist and doesn’t dry out. Thank you for the recipe!
That’s so great to hear Anna! 🙂
Thanks again for a great recipe Elien! I doubled the recipe and made two loaves on the weekend and it was great! I love that the bread doesn’t toughen up and dry out like a typical sourdough loaf which makes it great for using throughout the week. I ended up slicing it up and putting it in an old plastic bread bag that I recycled and keeping in the fridge for the family to help themselves. It has been a big hit in our household and I think it’ll become a regular bake for us.
Yay Liz that’s awesome to hear!!
Followed your advice to make two loaves! The second one actually turned out better as I found the cold dough much easier to shape… I had trouble with the first one so it didn’t hold its shape so well, but still turned out to have a lovely crumb. Thanks for the great recipe! x
I want to double this recipe and make two loaves (one for the freezer!), but I only have one loaf tin… could I leave half the dough for its warm and cold prove in a snap-top bowl, then reshape and transfer into the loaf tin once the first batch is baked? Or would it work as a free-form loaf?