Rustic Honey Oat Sourdough Bread
This honey oat sourdough has a deliciously soft crumb with a hint of honey sweetness.

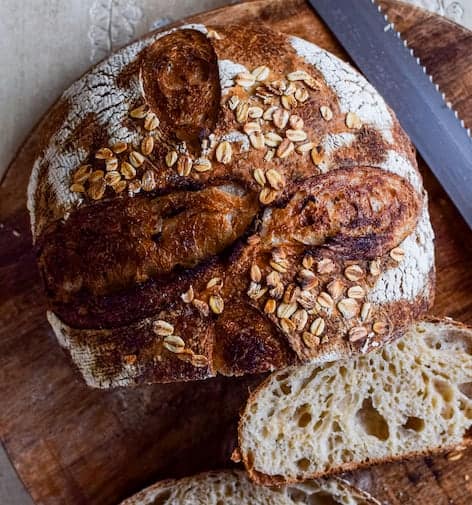
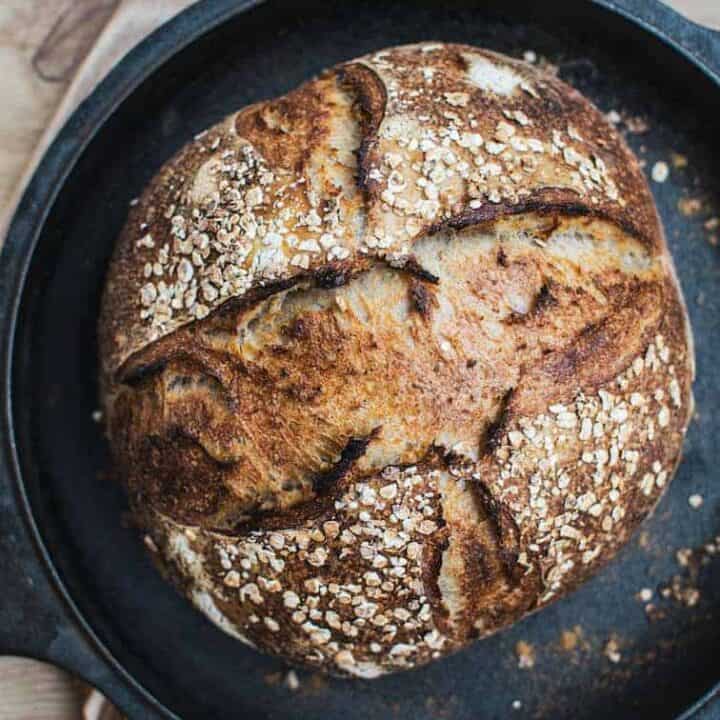
I love this soft honey oat sourdough. It’s not super sweet, just a mere hint of honey really. The oats and wholemeal flour make it really soft. I like shaping this loaf in a rustic way, with no fancy scoring. Just a well-browned crust, decorated with a scattering of oats, and a soft crumb.
Flours
This bread has quite a high hydration, much more so than my standard sourdough loaf, this is because of the addition of oats and wholemeal flour which soak up a lot of moisture.
The white flour portion of this bread needs to be strong bread flour, preferably one with a protein level of at least 11.5%. In this bread, a third of the flour is wholemeal. If you can, use a wholemeal flour that is finely ground and not one with large bran flakes in it.
Starter
As with all sourdough, a good active starter is crucial.
Feed your starter in 4-6 hours before you start the bread at 1:2:2 (1 part starter, 2 parts water, and 2 parts flour, in weight).
I’ll measure out 30g or so of my starter into a new jar, add 60g of water and 60g of flour and discard anything else. Then I’ll place it in a warm place to double.
Once I’m ready to bake I’ll measure out what I need of that doubled starter to use in the bread.

The leftover starter will be 1:1:1 stirred well and scooped into a clean jar. Then it’s back in the refrigerator for the next time I bake. Doing it this way can limit the acid build-up in your starter and it’s my preferred method.
I always use my starter when it has doubled and is thick and fluffy, but has not passed its peak. An exhausted starter, passed its peak will be quite acidic and makes the dough hard to work with.
The Dough
The first step is the autolyze which is simply mixing the main bread flour (and in this case the oats too) and water together to make a sticky, shaggy dough. Leave this to sit for a minimum of 30 minutes, but up to 3 hours.
Letting the water and the flour sit really improves the elasticity of the dough. I find this bread does best with a longer autolyze that’s at least an hour.
Coil Folding
Add the salt, starter, and liquid honey after the autolyze and squeeze and squish it together with wet hands until it’s all incorporated. Wet hands are awesome to stop the dough from sticking to you.
Tip the mixed dough into a flat dish. This makes the coil folding much easier. Leave it to sit and relax for 15 minutes.
I do 6 lots of coil folds, one lot every half an hour for 3 hours total. This strengthens the gluten bonds in the dough which will allow them to hold the gases created by the yeasts and bacteria. Each ‘lot’ of coil folds should have at least 4 folds but do as many as needed to create a dough ball.
The first fold will be the stickiest and it will rip and tear. However, as the folds go on you’ll see strength form in the dough and it will become stretchier as the folds continue. Coil folding is folding the dough on top of itself.
The video below shows folds #1 and #2 (with a 1/2 an hour rest in between) and you’ll see the difference in texture between the two.
I always use wet hands when folding!
After the folds, the dough needs to bulk ferment some more on the bench.
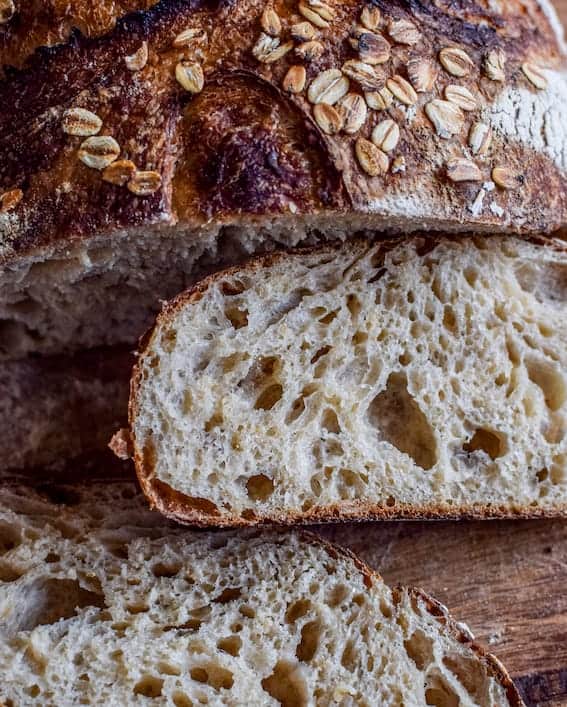
This is another really crucial bit! An under-fermented bread will be dense. An over-fermented crumb can collapse as the dough structure has weakened.
A well-fermented crumb in this bread will be lacy and open.
This dough needs to bulk out by 50% to be properly proofed. This doesn’t mean doubles, just that it gets half the amount bigger. Sometimes it’s hard to tell as it doesn’t rise up as much as commercial yeast bread. It may spread out too.
It can take around 3-4 hours depending on the heat in your kitchen. A bread will ferment much faster in summer than in winter.
Shaping
Once it has finished its bulk ferment it’s time for shaping and the cold proof.
To shape, generously dust the bench with flour, then tip the dough dish upside down. Use your fingers to coax it out and let it drop gently on the bench.
Unlike when folding, flour your hands when shaping the bread.
How you shape it can vary, you just need to focus on getting some tightness into the dough without completely degassing it. It’s a process of stretching the dough into a rectangle, folding it up, and then rolling it on the bench to create some surface tension.
There is a video on how I shape many of my bread on my Basic Sourdough Bread post. The dough in the video is my regular sourdough and has lower hydration than this dough so it’s firmer.
Then it’s placed in a well-floured banneton basket and into the fridge for 8-24 hours.
Baking and Scoring
On baking day, preheat your oven and cast iron pots to 230°C (450°F). I use a lodge cast iron combo cooker. The pan is what the bread sits in and the pot works as the lid to capture steam.
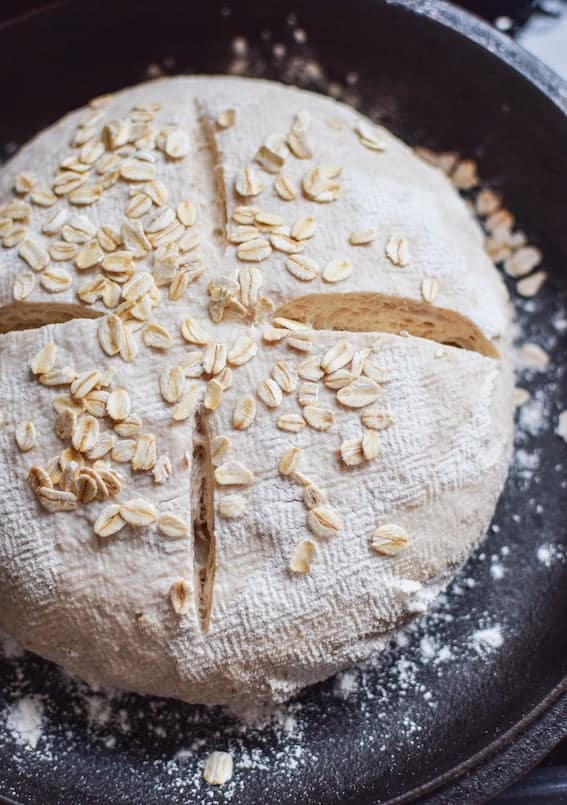
Once it’s been heated, remove the cast iron pan, flour it well and tip in the dough. Brush the dough with some water and sprinkle over some oats. Make a few slashes in the top to allow steam to escape.
Place on the lid and bake for 18-20 minutes. Remove the lid and bake uncovered for 10-15 minutes more until browned to your liking.
Allow the bread to cool for at least 2 hours before slicing.
Honey Oat Sourdough
Slightly sweet and beautifully soft, this is a delicious sourdough bread.
Ingredients
- 100 grams organic wholmeal flour , finely milled. See notes in post on flours
- 200 grams high-grade white flour
- 50 grams rolled oats, (not steel cut)
- 250 grams water
- 1 1/2 tbsp liquid honey (solid honey can be melted and left to slighly cool)
- 8 grams salt
- 100 grams active sourdough starter (at 100% hydration), See notes on starter in post
- rolled oats for topping
Instructions
- In a large bowl combine the flour, oats and water into a shaggy, sticky dough and let it sit for 1-3 hours to hydrate.
- Add in the sourdough starter, liquid honey, and the salt and combine together using wet hands, into a sticky dough. Tip in a flat glass or ceramic dish and leave it to relax for 15 minutes.
- Over the next three hours, stretch and fold this dough every 30 minutes, using a coil fold (see video), or your preferred stretch and fold method. The first folds will be very sticky but the dough will gain strength throughout the remaining folds.
- Now leave the dough on the bench to sit for another 3-4 hours until it has bulked out by 50%.It should feel airy and bouncy and should look noticeably fuller.
- Line a banneton basket (or another bowl) with a towel and flour it well.
- Tip your dough out carefully on a floured work surface and gently form it into a rectangle. Take care at this shaping stage to not squash the dough too much and lose all the gases that have been forming.
- Watch the short video above on shaping to see how to shape as written instructions are very hard to decipher. I have tried to explain them here:
- Take the bottom third of the dough and fold it up so it meets the middle. Take the right bottom side of the dough and fold it to meet the middle. Then take the left bottom side of the dough and fold it to meet the middle. Then take the top third of the dough and bring it down to meet the bottom. Now you have a sort of ball shape. Now you can stitch it grabbing a little bit of dough from the top left and a little from the top right and bringing them together to meet in the middle. Carry on doing this down the length of the dough. When you get to the bottom, grab a flap of dough and carry it up over the top of the stitched dough to meet at the top. This will again create a sort of ball. Now gently grab this ball and roll it gently towards you on the bench. This will create some surface tension. All the while, take care not to de-gas your dough too much. Place in the floured bowel or basket, smooth side down.
- Cover with a clean towel and refrigerator for 8-20 hours.
- On baking day, heat the oven and a lodge cast iron combo cooker or similar dutch oven to 230 °C (450 °F).
- Flour the bottom of the pot well. (If your dutch oven has high sides, use a long sheet of baking paper instead to lift the dough in and out of without burning yourself.) Flip the dough carefully out of the basket and brush it with some water. Sprinkle over the oats.
- Score the dough using a razor blade or a very sharp knife.
- Bake in the pot covered with the lid for 18-20 minutes. Remove the lid and bake uncovered for 15-20 minutes more depending on your preference.
- Let the sourdough cool before slicing.
Notes
Updated Jan 2021 * - This loaf used to use 140g sourdough starter but the recipe has since been updated to using 100g.
Nutrition Information:
Yield: 4 Serving Size: 1 gramsAmount Per Serving: Unsaturated Fat: 0g


This looks so good! What a great combination of flavors!
I baked this recipe this morning and it came out perfectly. Thank you so much! It is a winner recipe for sure. I baked mine in a normal loaf tin with a steam tray and it had a beautiful open crumb!
Ooh I like the idea of baking this one in a loaf pan! So happy you enjoyed it 😃