Easy Sourdough Ciabatta Rolls
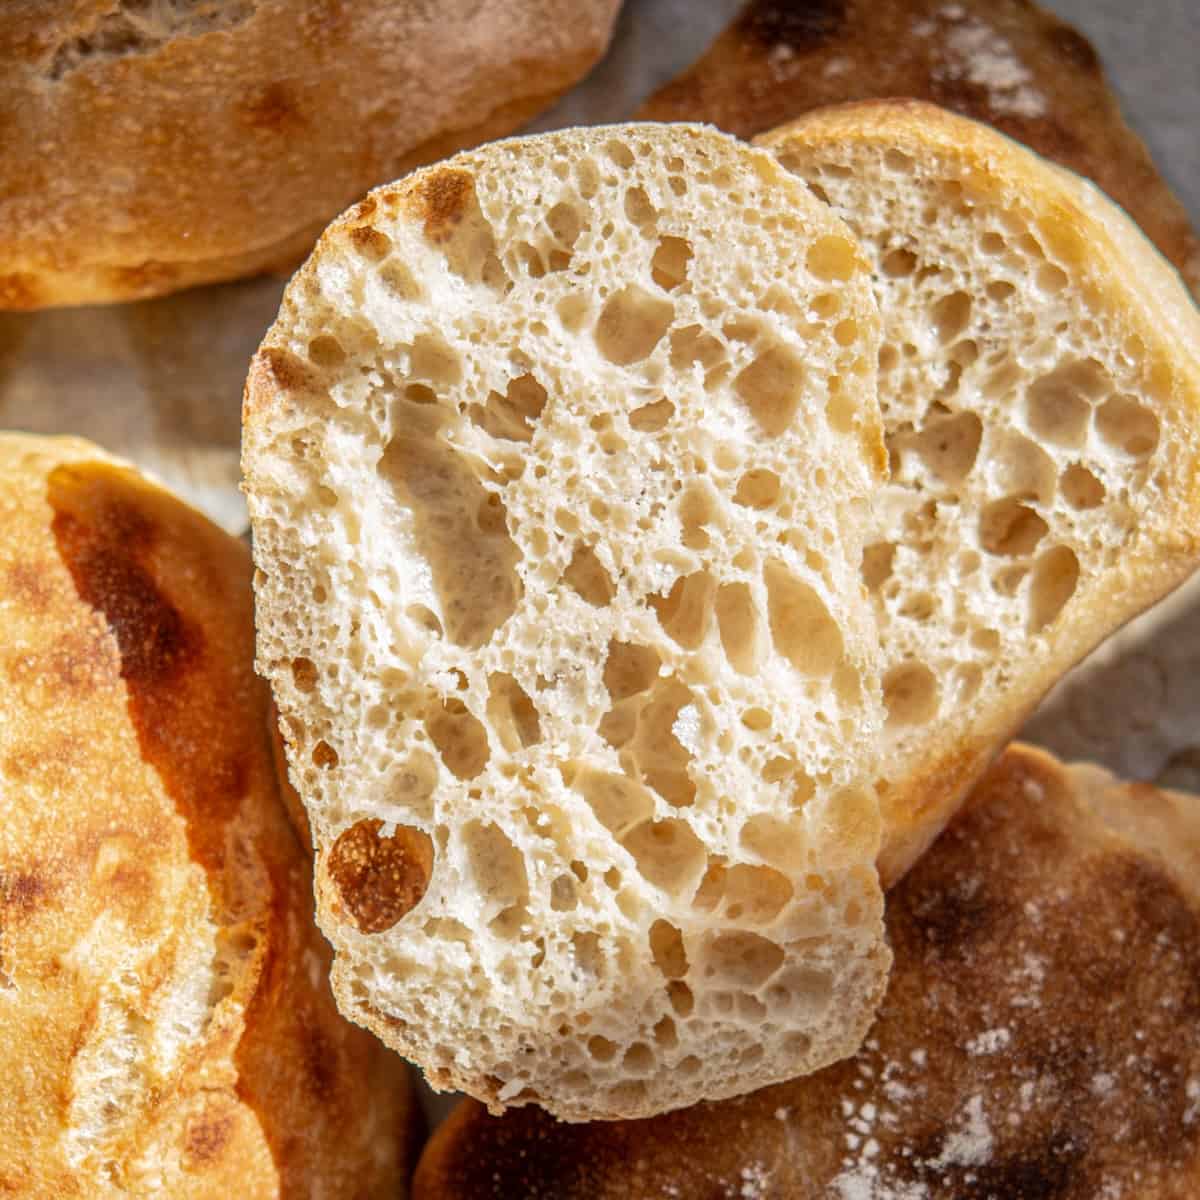
These sourdough ciabatta rolls are light and airy, with a chewy golden crust. They’re very easy to make, with a high hydration dough, rustically cut into squares and baked.

Ciabatta means ‘slipper‘ in Italian. The dough for these sourdough ciabatta bread rolls is very wet and slack, which means that the bread spreads out into a slipper shape. If this is your first time working with a wet dough like this (about 83% hydration), you might be a little worried at first because it’s initially so slack. Don’t worry though, if your starter is in optimum condition, and you’ve got a strong flour, you’ll see this wet and sloppy dough grow into something beautifully elastic over time. It’s important to add enough water to a ciabatta dough, because that’s what gives it that lovely open crumb.
Baker’s Schedule
The dough is made over a period of two days, with an overnight cold proof. The cold ferment brings additional flavors into the bread.
After the cold-proof, the dough is cut into rustic squares or rectangles. Then, they are left to rest for a little longer and baked in a hot oven with a little water to create some steam.

Ingredients
This sourdough ciabatta dough is a lean dough so you don’t need many ingredients! The full dough ingredients amounts are in the ecipe card at the bottom of this post
- Strong bread flour – Strong bread flour is best to use for the ciabatta dough. The extra protein in bread flour allows for a high-hydration dough that’s much more elastic and easy to work with. That being said, you can use all-purpose flour too as long as it has a protein level of at least 11%.
- Active sourdough starter
- Extra virgin olive oil
- Water
- Salt
Method
Day 1
- In the morning feed your starter. It needs to at least double, if not triple, but be used before it passes its peak and collapses.
- When the starter has nearly finished rising, in a large bowl mix together the flour and water into a sticky and shaggy dough. Leave this to autolyze for at least 30 minutes.
- Add the olive oil, salt, and risen starter and mix it well together until everything is combined. It makes a very sticky and wet dough. Tip this sticky dough into a shallow dish or clean bowl and leave it to sit for 15-20 minutes
Folding
- Over the next 3 hours, stretch fold the dough every 30 minutes (6 sets of folds in total.)

- Stretch and fold – Using wet hands, take one side of the dough and stretch it up, then pull it over itself. Turn the bowl a quarter turn and repeat this move. Continue stretching and folding and turning the bowl until all sides have been folded. That is ‘one set’ of stretch and folds.

- You can do traditional stretch and folds, coil folds, or whatever folds you prefer.
- I like to tuck the dough under itself while I fold it to create a smooth top. Always use wet hands to stop the dough sticking during folds.
- In between each of the sets of stretches and folds, let the dough rest. Cover the bowl with a plate or damp towel to stop the dough from drying out.
- Initially, the dough will be very sticky and wet, and the first stretch will be very slack. After a few folds, it will hold together more, and the final dough will be very elastic. If your starter was in good condition and not collapsed or too acidic, you will easily feel improvement as the folds go on.
Bulk rise

- After the folds, let the dough bulk ferment in a warm place, ideally around 25°C/77°F for about 3-5 hours until it shows clear signs of fermentation and has risen by around 60%.

- You can place the dough in a clear container with straight sides to easily tell if it has risen. Add a lid onto the container to prevent the dough from drying out.
- The total time will depend on the temperature. Once the dough has risen, keep it covered and refrigerate it overnight.
The following day
- Generously flour a work surface. Line a baking sheet with a piece of parchment paper and generously dust it with flour.
- Tip the cold dough out onto the floured work surface. Use floured hands to pull the dough rectangle to a size of 23x28cm/ 9×11 inches. Use a dough scraper to push the sides of the dough to make them straighter.

- Generously dust the top of the dough with flour and use a bench scraper to cut the dough in half lengthwise.

- Then cut it into thirds width-wise to create 6 pieces. They will be rustic.
- Use the bench scraper or floured hands to carefully pick up the pieces of dough and transfer them to the baking tray. Nudge the dough into place with the bench scraper, or use your fingers to tuck in the edges.
- Leave the dough to rest at room temperature for around an hour and preheat the oven to 450 °F/ 230°C while the dough is resting.


Baking
- After the dough pieces have sat, spray or drizzle the tops of the dough lightly with water. You can also add a few cubes of ice in a pan at the bottom of the oven to create some extra steam.
- Bake the rolls for around 20 minutes until deep golden brown. If they are browning unevenly, rotate the oven rack halfway through baking.
- After baking, let the rolls cool right down on a wire rack to room temperature before slicing and serving.

More sourdough recipes
You might like these too!
For more soft dough ideas, visit the Rolls, Buns and Bagels hub. You can find all sourdough recipes and guides in the main Sourdough hub.
Sourdough Ciabatta Rolls
Ingredients
Levain
- 35 g starter
- 35 g all-purpose flour
- 35 g water
Ciabatta dough
- 420 g bread flour
- 340 g water
- 13 g extra virgin olive oil
- 9 g salt
- All the levain (around 90g active starter)
Instructions
- In the morning, feed your levain. It needs to at least double, if not triple, but be used before it passes its peak and collapses.
- When the levain has nearly finished rising, mix the flour and water in a large bowl to form a sticky and shaggy dough. Let this rest for at least 30 minutes.
- Add the olive oil, salt, and levain and mix well until everything is combined. This makes a very sticky and wet dough. Let it rest for 10-15 minutes.
Bulk Ferment
- Over the next 3 hours, stretch fold the dough every 30 minutes (6 sets of folds total.)
- You can do traditional stretch and folds, coil folds, or whatever folds you prefer. I like to tuck the dough under itself while I fold it to create a smooth top. Always use wet hands to stop the dough from sticking during folds.
- Let the dough rest between each set of stretches and folds. Cover the bowl with a plate or damp towel to prevent the dough from drying out.
- Initially, the dough will be very sticky and wet, and the first stretch will be very slack. After a few folds, it will hold together more, and the final dough will be very elastic. If your starter was in good condition and not collapsed or too acidic, you will quickly feel improvement as the folds go on.
- After the folds, let the dough bulk ferment in a warm place, ideally around 25°C/77°F, for about 3-5 hours until it shows clear signs of fermentation and has risen by around 60%.
- You can place the dough in a clear container with straight sides to easily tell if it has risen. Add a lid to the container to prevent the dough from drying out.
Cold proof
- The total time will depend on the temperature. Once the dough has risen, keep it covered and refrigerate it overnight.
Shaping
- Generously flour a work surface. Line a baking sheet with a piece of parchment paper and generously dust it with flour.
- Tip the cold dough out onto the floured work surface. Use floured hands to pull the dough rectangle measuring 23x28cm/ 9×11 inches. Use a dough scraper to push the sides of the dough to make them straighter.
- Generously dust the top of the dough with flour and use a bench scraper to cut the dough in half lengthwise. Then, cut it into thirds width-wise to create six pieces. They will be rustic.
- Use the bench scraper or floured hands to carefully pick up the pieces of dough and transfer them to the lined baking tray. Nudge the dough into place with a floured bench scraper, or use floured fingers to tuck in the edges if they have stretched out.
- Leave the dough to rest at room temperature for around an hour until lightly puffier and preheat the oven to 450 °F/ 230°C while the dough rests.
Baking
- After the dough pieces have sat, spray or drizzle the tops of the dough lightly with water. You can also add a few cubes of ice in a pan at the bottom of the oven to create some extra steam.
- Bake the rolls for around 20-25 minutes until deep golden brown. If they are browning unevenly, rotate the oven rack halfway through baking.
- After baking, let the rolls cool right down on a wire rack to room temperature before slicing and serving.
Notes
- Stretch and fold – Using wet hands, take one side of the dough and stretch it up, then pull it over itself. Turn the bowl a quarter turn and repeat this move. Continue stretching and folding and turning the bowl until all sides have been folded. That is ‘one set’ of stretch and folds.
- Coil folding – Using wet hands, coax the sides of the dough up with your fingers and lift it up from the middle and back onto itself. Turn the dough and repeat on all sides, until it forms a ball. If the dough sticks too much to your hands, wet them again


Hi there, how long do you think this could be left in the fridge for? Could it be stretched the following afternoon?
Hey yeah that should be just fine! I’ve extended the cold proof before for up to 36 hours and have had good results 🙂