Sourdough Pizza Dough Recipe (No Yeast!)
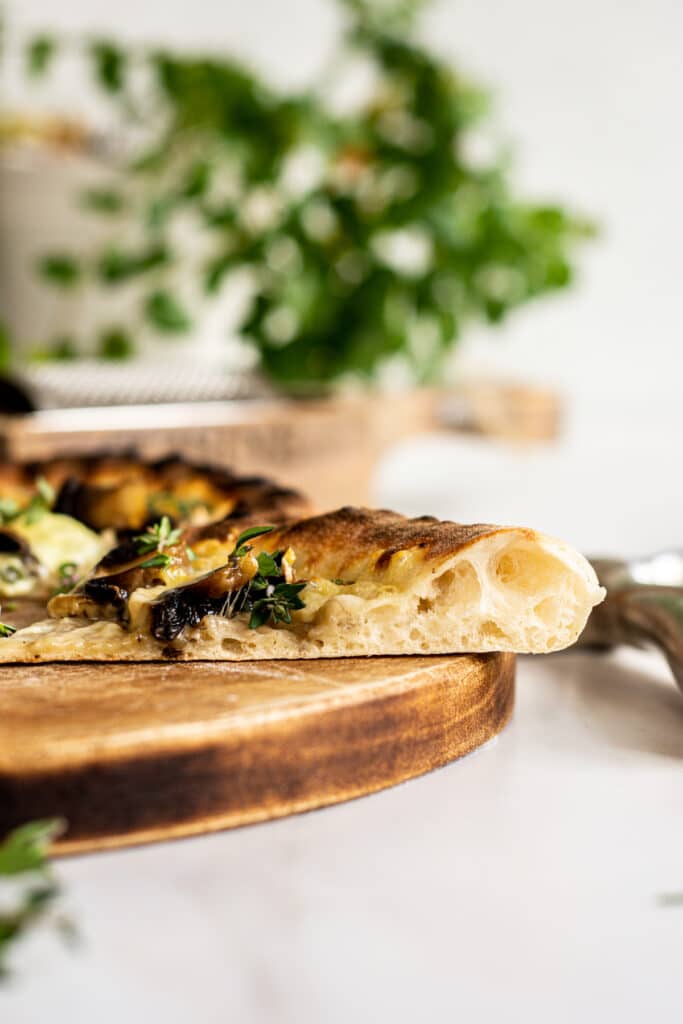
Homemade pizza is the best, especially when it’s made with a sourdough pizza crust. It’s light with a slightly chewy crust, and with so much flavor.
This sourdough pizza crust recipe undergoes a long fermenting time, but the actual process is very hands-off! It can use a sourdough discard starter or a bubbly and more recently fed starter.
Sourdough starter
Sourdough discard starter is any excess sourdough starter you have. It can be a sourdough starter discard or a recently fed and bubbly active starter. The sourdough starter ferments the dough, brings rise without commercial yeast needed, and adds great texture and flavor.
If your sourdough starter is super new, like under a week old, it might not have enough of a yeast colony yet to provide the rise in the pizza dough. Wait until you have discarded starter from an established starter.
The dough undergoes a cold-proof which is when the bacteria in the sourdough starter will get to work and begin breaking down the starches in the flour and brings flavor to the dough.
Ingredients
This dough contains only 4 simple ingredients. The amounts are written in the recipe card below. You will need –
- Strong all-purpose flour or bread flour
- Water
- Sourdough starter
- Salt
The flour
For this recipe, use bread flour or a strong all-purpose flour with a protein level of at least 11%. The extra gluten in stronger flours means it’s much easier to work with, especially when it undergoes a long fermentation period.
Baker’s schedule
Here is a rough baker’s schedule for the sourdough pizza dough recipe. The timings of the recipe will need to be adapted if your kitchen is very warm, as an overnight bulk ferment could lead the dough to overproof.* See notes below.
Night before (Day 1)
- 8 pm – Mix dough and leave to sit at room temperature overnight
Day 2
- 8 am – Fridge proof
- 4:30 pm – Pre-shape
- 5:00 pm – Shape
- Cook
*Notes – In a warm kitchen, the dough can be mixed in the afternoon of day one, bulked for around 6 hours, and then refrigerated overnight. This can also be done if you are using a fed and active starter as opposed to discard starter.
Bulk fermentation
The dough undergoes a fermentation process at room temperature and then it also has a cold-proof. The room temperature dough rise is to establish the yeast in the starter so they can bring rise to the wild yeast pizza dough. The cold dough rest is so that the bacteria in the starter can bring flavor to the dough.
The bacteria in the starter produce different acids depending on the temperature of the dough. At high temperatures, they produce lactic acid and at lower temperatures, the bacteria produce acetic acid. The combination of both these brings the best and most complex flavor.
Step by step instructions
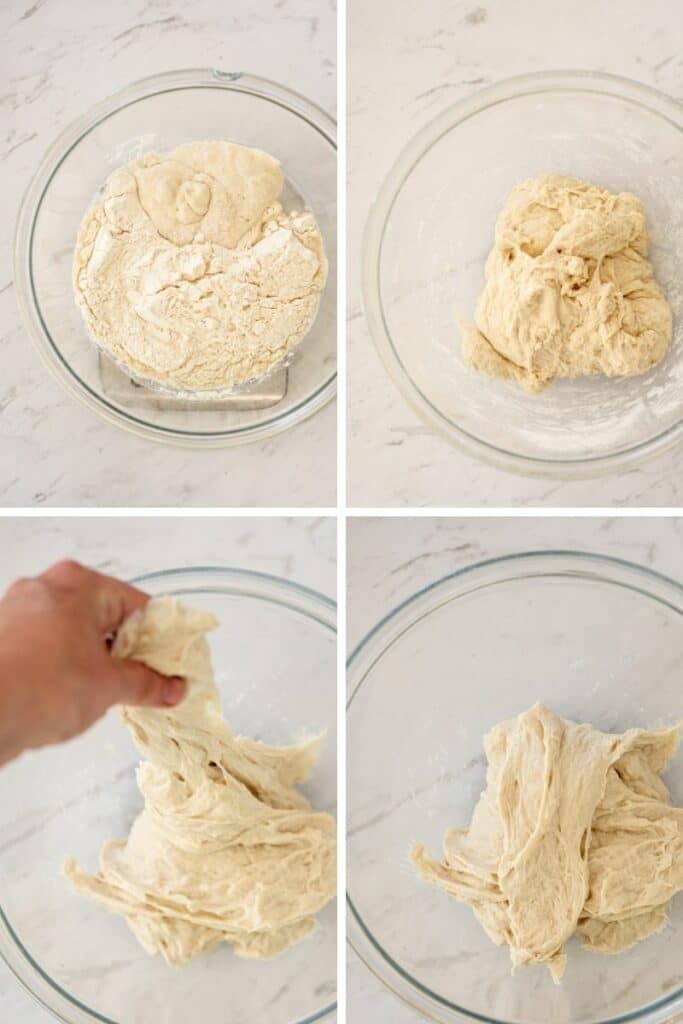
The night before, mix all the sourdough pizza dough ingredients together in a large bowl into a shaggy and sticky dough. Leave it to sit for 20 minutes then perform one set of stretches and folds.
This is when you pull a side of the dough up over itself. Use wet hands to do this, so the dough doesn’t stick to you. Repeat this on all sides. You can also mix the dough in a bowl of a stand mixer fitted with a dough hook.
Cover the bowl with a sealed lid, a beeswax wrap, or compostable plastic wrap to stop the top of the dough drying out. Leave it to sit at room temperature overnight (or for the afternoon for 6 hours if your kitchen is warm, or you’re using an active and fed starter. After this, refrigerate the dough overnight.)
The following day
In the morning, perform another set of stretches and folds. The texture of the dough will be much stretchier and more elastic than yesterday.
Place the dough in the fridge for a minimum of 4 hours or up to 24 hours. After the cold-proof, the dough is pre-shaped into 2 equal portions. Shape each piece into a tight ball and leave them to rest on a floured surface for around 30 minutes, covered with a tea towel
After this period it is shaped and cooked.
Shaping
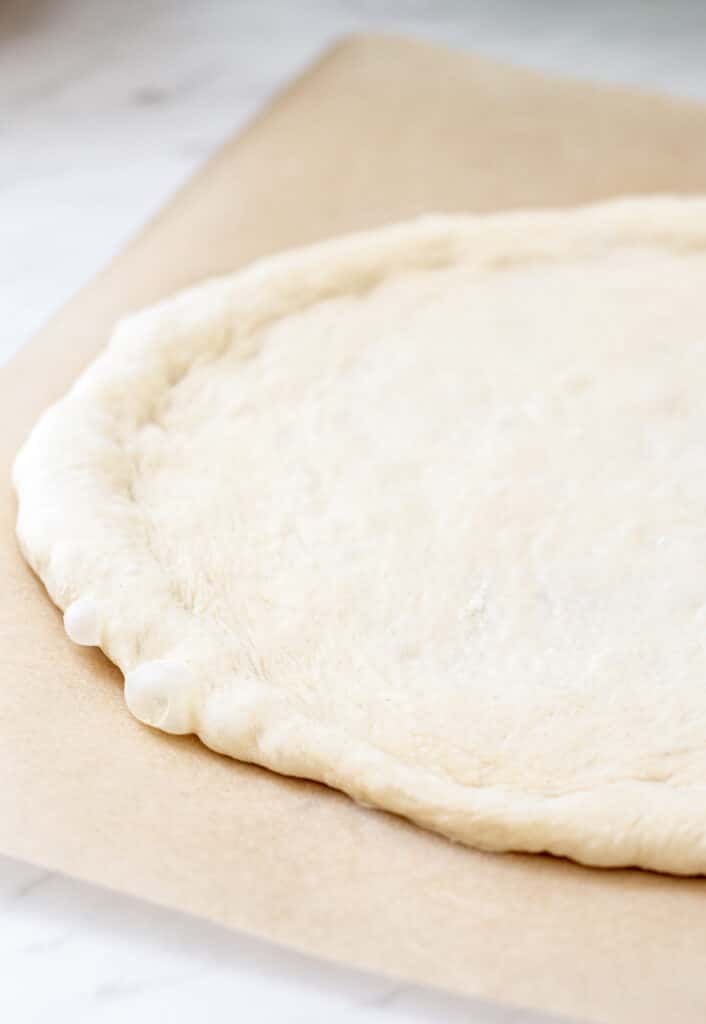
To shape the sourdough pizza dough, take one dough ball and place it on a piece of floured parchment paper on a work surface. The dough will be quite sticky underneath so use the flour you need to ensure it can easily come off the parchment paper.
Use floured hands to gently press the dough out into an 8inch/20cm circle. Press the dough outwards so there is a thick crust around the pizza base.
If the dough keeps springing back, let it rest for another 10 minutes before trying again. If you’re wanting thin-crust pizzas you can use a rolling pin instead to roll the dough out into a thin circle.
Cooking the pizza
The rule for cooking pizza is the hotter the temperature, the better the pizza will be. A home oven generally doesn’t get that hot so a pizza oven will always be your best bet for cooking a good pizza.
Pizza is best when cooked really hot and really fast. If you have a pizza stone, use that too! If using a home oven, turn it up to as hot as it can go (usually that’s about 250-260°C/482-500°F).
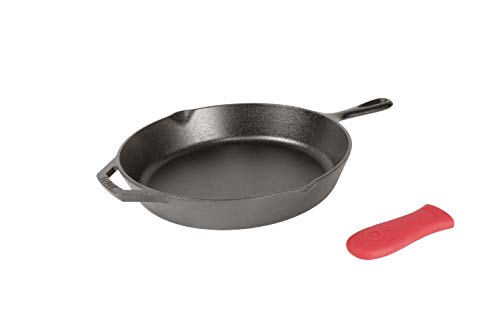
The pizza can also be made in a cast-iron skillet. Cast-iron traps really well. Press the dough into a greased cast iron skillet, then bake in hot a pre-heated oven until puffed and browned.
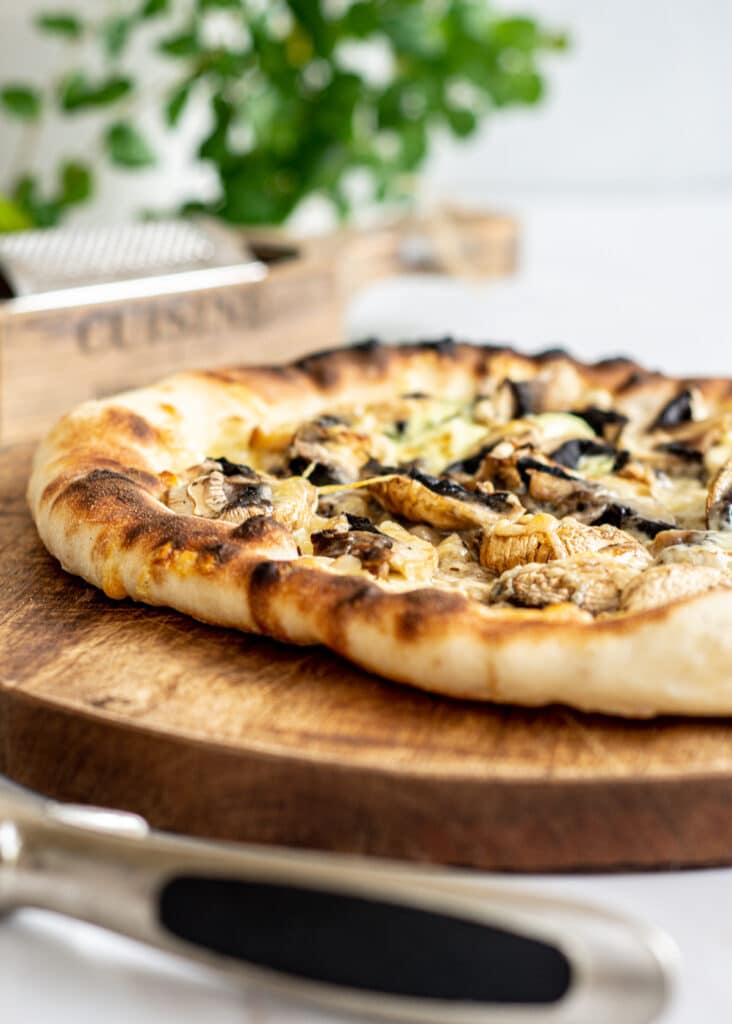
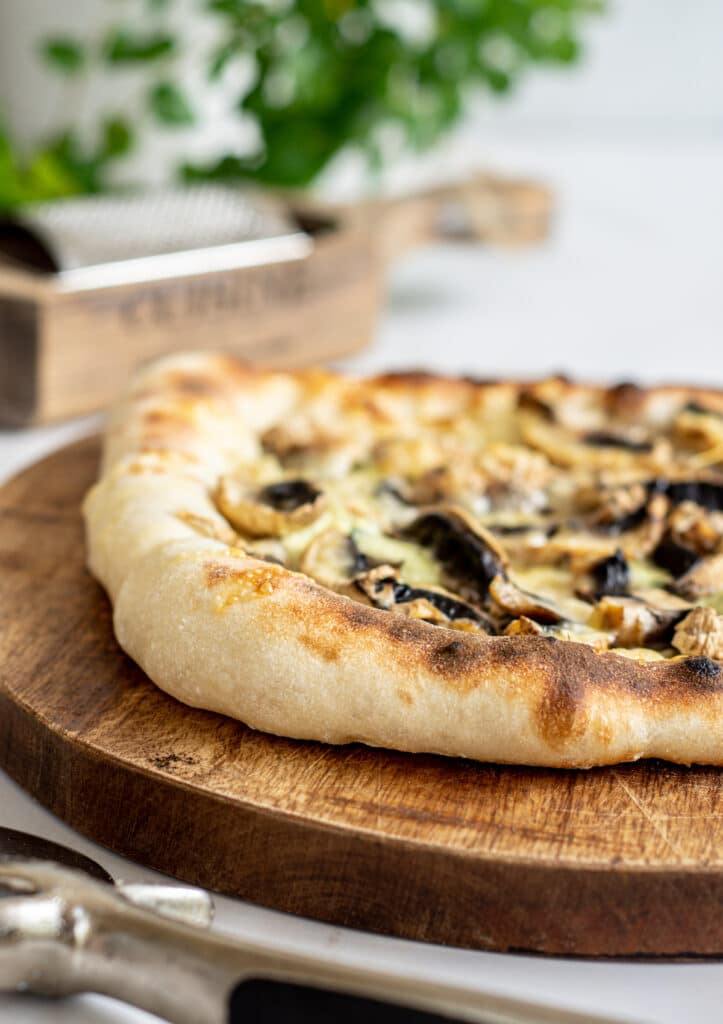
Favorite pizza toppings
Top the dough with your favorite toppings. Try
- Mushrooms
- Pizza tomato sauce
- Fresh mozzarella
- Pepperoni
- Roasted bell peppers
- Red onion
…and so many others!
Other sourdough recipes
For sourdough recipes, try –
- Sourdough bread with caraway seeds
- Pumpkin Sourdough Muffins
- Chocolate banana bread with sourdough
- Sourdough discard donuts
- Chocolate Sourdough babka
- Sourdough cheese scones

Sourdough Pizza Dough Recipe (No Yeast!)
This sourdough discard pizza dough uses a sourdough discard starter to create the most delicious pizza crust.
Ingredients
- 400g all-purpose flour (with at least 11% protein)
- 280g water
- 80g discard starter
- 8g salt
Instructions
The night before
- Mix the flour, water, discard starter, and salt together in a bowl into a shaggy and sticky dough. Leave it to sit for 20 minutes then perform one set of stretches and folds. This is when you pull a side of the dough up over itself. Use wet hands to do this, so the dough doesn't stick to you. Repeat this on all sides.
- Cover the bowl and leave it to sit at room temperature overnight. *
The following day
- In the morning, perform another set of stretches and folds and then place the dough in the fridge in an airtight container for a minimum of 4 hours or up to 24 hours.
Pre-shape
- After the cold-proof, take the dough from the fridge and cut it into 2 even-sized pieces. Shape each piece into a tight ball and leave them to rest on a floured surface for 30 minutes, covered with a tea towel.
Shaping
- Take one dough ball and place it on a piece of floured parchment paper. The dough will be quite sticky underneath so use the flour you need to ensure it can easily come off the parchment.
- Use floured hands to gently press the dough out into a 20cm/8inch circle. Press the dough outwards so there is a thicker crust around the pizza base. If the dough keeps springing back, let it rest for another 10 minutes before trying again. Top with your favorite toppings and cook
Cooking the pizza
- Pizza is best when cooked really hot and really fast. If using a home oven, turn it up to as hot as it can go (usually that's about 250-260°C/482-500°F) and bake for 8-10 minutes. The pizza can also be made in a cast-iron skillet. Cast-iron traps really well. Dress a skillet with olive oil, then press the dough into the skillet. Bake in a hot pre-heated oven until puffed and browned.
Notes
*In a warm kitchen, the dough can be mixed in the afternoon of day one, bulked for around 6 hours, and then refrigerated overnight. This can also be done if you are using a fed and active starter as opposed to discard starter.
Recommended Products
As an Amazon Associate and member of other affiliate programs, I earn from qualifying purchases.

Nutrition Information:
Yield: 8 Serving Size: 1Amount Per Serving: Calories: 182Total Fat: 0gSaturated Fat: 0gTrans Fat: 0gUnsaturated Fat: 0gCholesterol: 0mgSodium: 390mgCarbohydrates: 38gFiber: 1gSugar: 0gProtein: 5g
This is THE BEST PIZZA CRUST ever! I have tried so many recipes and techniques, was skeptical but tried yet one more – this one. Consistently every run of this recipe as written has produced the best crust every time. I even forgot I had some leftover dough in the fridge and made a pie about 5 days later – figured what the heck the oven was hot from breadmaking 🙂 – and much to my surprise it was awesome. Started trying other recipes here as well, so far so good!
Can you freeze the pizza dough?
Hey yes you can freeze it after the bulk ferment at room temperature.
When you say freeze after the first ferment, after you thaw it would you do the ferment in the fridge before baking?
Hey no you don’t need to do that one after freezing